The dialog is a small window that prompts the user to make a decision or enter additional information.
The dialog does not fill the screen and is normally used for modal events that require users to take any action before they can proceed.
Some times in your application, if you wanted to ask a user about making a decision between yes or no in the response to any particular action taken by a user,
by remaining in the common activity and without changing the screen, you can use Alert Dialog.
During an order to make an alert dialog, you need to make an object of AlertDialogBuilder which an inner class of AlertDialog.
Its syntax is given below
AlertDialog.Builder alertDialogBuilder = new AlertDialog.Builder(this);
Methods used to add an Alert dialog
To add an action button to the Alert dialog, you have to use the following methods.
- setPositiveButton (CharSequence text, DialogInterface.OnClickListener listener): The first argument is the text to be displayed. The second argument is the listener to be invoked when the positive button is pressed.
- setNegativeButton (CharSequence text, DialogInterface.OnClickListener listener): The arguments are the same as the setPositiveButton method. However, the second argument is applicable when the negative button is pressed.
- setNeutralButton (CharSequence text, DialogInterface.OnClickListener listener): The arguments are same as the SetPositiveButton method.
In the alert dialog, we can add custom views such as editedtext, listview, button, etc. Here I am telling how to set listview in an alert dialog. Follow below steps to add listview in an alert dialog .
- Add button in activity_main.xml file
 <RelativeLayout xmlns:android="http://schemas.android.com/apk/res/android"    xmlns:tools="http://schemas.android.com/tools" android:layout_width="match_parent"
android:layout_height="match_parent"
android:paddingBottom="@dimen/activity_vertical_margin"
android:paddingLeft="@dimen/activity_horizontal_margin"
android:paddingRight="@dimen/activity_horizontal_margin"
android:paddingTop="@dimen/activity_vertical_margin"
tools:context=".MainActivity" >

android:layout_width="match_parent"
    android:layout_height="match_parent"
    android:paddingBottom="@dimen/activity_vertical_margin"
    android:paddingLeft="@dimen/activity_horizontal_margin"
    android:paddingRight="@dimen/activity_horizontal_margin"
    android:paddingTop="@dimen/activity_vertical_margin"
    tools:context=".MainActivity" >
- Add listview in another XML layout
<?xml version="1.0" encoding="utf-8"?>
<LinearLayout xmlns:android="http://schemas.android.com/apk/res/android"
android:layout_width="match_parent"
android:layout_height="match_parent"
android:orientation="vertical" ><ListView
android:id="@+id/mylistview"
android:layout_width="fill_parent"
android:layout_height="wrap_content" >
</ListView></LinearLayout>
- Add layout for custom listview item in another XML file name as listview_item.xml file
<?xml version="1.0" encoding="utf-8"?>
<LinearLayout xmlns:android="http://schemas.android.com/apk/res/android"
android:layout_width="match_parent"
android:layout_height="match_parent"
android:orientation="horizontal" ><ImageView
android:id="@+id/image_item"
android:layout_width="50sp"
android:layout_height="50sp"
android:src="@drawable/ic_launcher" /><TextView
android:id="@+id/tvtext_item"
android:layout_width="wrap_content"
android:layout_height="wrap_content"
android:layout_marginTop="15sp"
android:text="Height"
android:textSize="18sp" /></LinearLayout>
- Add following code in MainActivity.class
package com.example.listviewinandroiddialog;
import java.util.ArrayList;
import java.util.List;
import android.os.Bundle;
import android.app.Activity;
import android.app.AlertDialog;
import android.content.Context;
import android.content.DialogInterface;
import android.view.LayoutInflater;
import android.view.Menu;
import android.view.View;
import android.view.View.OnClickListener;
import android.view.ViewGroup;
import android.widget.AdapterView;
import android.widget.AdapterView.OnItemClickListener;
import android.widget.ArrayAdapter;
import android.widget.Button;
import android.widget.ListView;
import android.widget.TextView;
import android.widget.Toast;
public class MainActivity extends Activity {
Button btnDialog;
AlertDialog.Builder alertDialog;
ArrayList<String> myList;
@Override
protected void onCreate(Bundle savedInstanceState) {
super.onCreate(savedInstanceState);
setContentView(R.layout.activity_main);
myList = new ArrayList<String>();
myList.add("India");
myList.add("China");
myList.add("South Africa");
myList.add("USA");
myList.add("UK");
myList.add("Japan ");
myList.add("Canada");
alertDialog = new AlertDialog.Builder(MainActivity.this);
btnDialog = (Button) findViewById(R.id.btnDialog);
btnDialog.setOnClickListener(new OnClickListener() {
@Override
public void onClick(View v) {
// TODO Auto-generated method stub
AlertDialog.Builder alertDialog = new AlertDialog.Builder(
MainActivity.this);
LayoutInflater inflater = getLayoutInflater();
// create view for add item in dialog
View convertView = (View) inflater.inflate(R.layout.listview, null);
// on dialog cancel button listner
alertDialog.setNegativeButton("Cancel",
new DialogInterface.OnClickListener() {
@Override
public void onClick(DialogInterface dialog,
int which) {
// TODO Auto-generated method stub
}
});
// add custom view in dialog
alertDialog.setView(convertView);
ListView lv = (ListView) convertView.findViewById(R.id.mylistview);
final AlertDialog alert = alertDialog.create();
alert.setTitle(" Select country...."); // Title
MyAdapter myadapter = new MyAdapter(MainActivity.this,
R.layout.listview_item, myList);
lv.setAdapter(myadapter);
lv.setOnItemClickListener(new OnItemClickListener() {
@Override
public void onItemClick(AdapterView<?> arg0, View arg1,
int position, long arg3) {
// TODO Auto-generated method stub
Toast.makeText(MainActivity.this,
"You have selected -: " + myList.get(position),
Toast.LENGTH_SHORT).show();
alert.cancel();
}
});
// show dialog
alert.show();
}
});
}
class MainListHolder {
private TextView tvText;
}
private class ViewHolder {
TextView tvSname;
}
class MyAdapter extends ArrayAdapter<String> {
LayoutInflater inflater;
Context myContext;
List<String> newList;
public MyAdapter(Context context, int resource, List<String> list) {
super(context, resource, list);
// TODO Auto-generated constructor stub
myContext = context;
newList = list;
inflater = LayoutInflater.from(context);
}
@Override
public View getView(final int position, View view, ViewGroup parent) {
final ViewHolder holder;
if (view == null) {
holder = new ViewHolder();
view = inflater.inflate(R.layout.listview_item, null);
holder.tvSname = (TextView) view.findViewById(R.id.tvtext_item);
view.setTag(holder);
} else {
holder = (ViewHolder) view.getTag();
}
holder.tvSname.setText(newList.get(position).toString());
return view;
}
}
@Override
public boolean onCreateOptionsMenu(Menu menu) {
// Inflate the menu; this adds items to the action bar if it is present.
getMenuInflater().inflate(R.menu.main, menu);
return true;
}
}
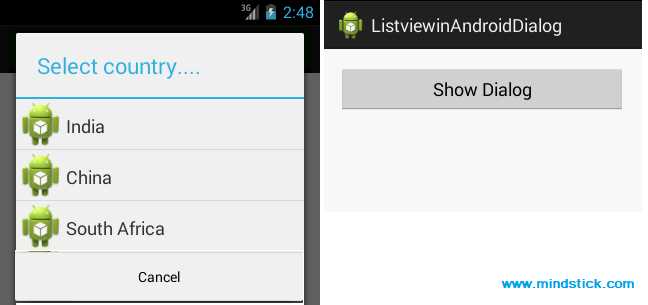
Now run your application

Press on button and you can see dialog with listview.
Read also this Article :- Dropdownlist Using BootStrap in ASP.Net


Leave a Comment