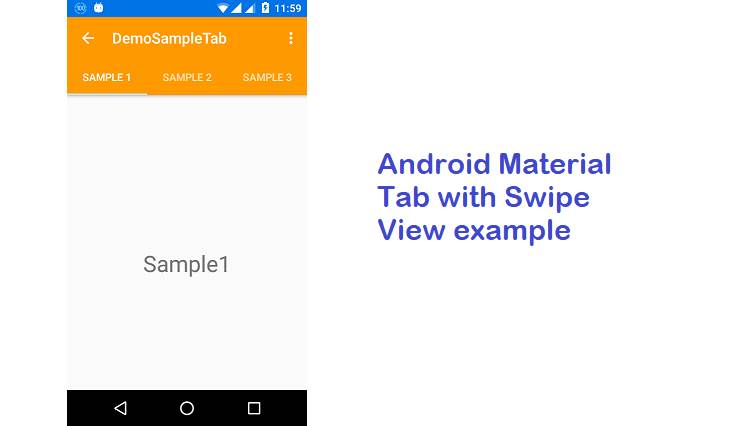
The Android Material design is developed by google which functionality available in Android 5.0 (API Level 21) and above.
Android Material design can be used from the Android 2.1 version with the v7 appcompat library.
Basically Android Material design is an Android design support library.
In Design support Library the components like navigation drawer, floating action button, snackbar, tabs, floating labels, and animation frameworks were introduced.
Here Material Design example

Now I am creating a sample of Android Material Tab example
Follow the below step to create a sample of Material tab
- Open Android Studio and create Blank Activity
- Open build.gradle and add the android design support library
com.android.support:design:23.0.1
dependencies {
compile fileTree(dir: 'libs', include: ['*.jar'])
compile 'com.android.support:appcompat-v7:22.1.1'
compile 'com.android.support:support-v4:22.1.1'
compile 'com.android.support:design:22.2.0'
}
Now Open res/values/colors.xml and add below color values
<?xml version="1.0" encoding="utf-8"?>
<resources>
<color name="colorPrimary">#FF9900</color>
<color name="colorPrimaryDark">#0073e6</color>
<color name="textColorPrimary">#FFFFFF</color>
<color name="windowBackground">#FFFFFF</color>
<color name="navigationBarColor">#000000</color>
<color name="colorAccent">#c8e8ff</color>
</resources>
Now add custom theme in style.xml which is located on res/values/style.xml
<style name="MyTheme.Base" parent="Theme.AppCompat.Light.DarkActionBar">
<item name="windowNoTitle">true</item>
<item name="windowActionBar">false</item>
<item name="colorPrimary">@color/colorPrimary</item>
<item name="colorPrimaryDark">@color/colorPrimaryDark</item>
<item name="colorAccent">@color/colorAccent</item>
</style>
<style name="MyTheme" parent="MyTheme.Base">
<item name="android:windowContentTransitions">true</item>
<item name="android:windowAllowEnterTransitionOverlap">true</item>
<item name="android:windowAllowReturnTransitionOverlap">true</item>
<item name="android:windowSharedElementEnterTransition">@android:transition/move</item>
<item name="android:windowSharedElementExitTransition">@android:transition/move</item>
</style>
Modify your theme name from AndroidManifest.xm file android:theme="@style/MyTheme"
<?xml version="1.0" encoding="utf-8"?>
<manifest xmlns:android="http://schemas.android.com/apk/res/android"
package="com.example.msclient009.demosampletab" >
<application
android:allowBackup="true"
android:icon="@drawable/ic_launcher"
android:label="@string/app_name"
android:theme="@style/MyTheme" >
<activity
android:name=".MainActivity"
android:label="@string/app_name" >
<intent-filter>
<action android:name="android.intent.action.MAIN" />
<category android:name="android.intent.category.LAUNCHER" />
</intent-filter>
</activity>
</application>
</manifest>
Add the following layout in activity_main.xml file
<android.support.design.widget.CoordinatorLayout xmlns:android="http://schemas.android.com/apk/res/android" xmlns:app=http://schemas.android.com/apk/res-auto
android:layout_width="match_parent"
android:layout_height="match_parent">
<android.support.design.widget.AppBarLayout
android:layout_width="match_parent"
android:layout_height="wrap_content"
android:theme="@style/ThemeOverlay.AppCompat.Dark.ActionBar">
<android.support.v7.widget.Toolbar
android:id="@+id/toolbar"
android:layout_width="match_parent"
android:layout_height="?attr/actionBarSize"
android:background="?attr/colorPrimary"
app:layout_scrollFlags="scroll|enterAlways"
app:popupTheme="@style/ThemeOverlay.AppCompat.Light" />
<android.support.design.widget.TabLayout
android:id="@+id/tabs"
android:layout_width="match_parent"
android:layout_height="wrap_content"
app:tabMode="fixed"
app:tabGravity="fill" />
</android.support.design.widget.AppBarLayout>
<android.support.v4.view.ViewPager
android:id="@+id/viewpager"
android:layout_width="match_parent"
android:layout_height="match_parent"
app:layout_behavior="@string/appbar_scrolling_view_behavior" />
</android.support.design.widget.CoordinatorLayout>
Create three layout file for the show on tab layout name as sample1.xml, sample2.xml, sample3.xml file and add textview on both layouts
<?xml version="1.0" encoding="utf-8"?>
<LinearLayout xmlns:android="http://schemas.android.com/apk/res/android"
android:layout_width="match_parent"
android:layout_gravity="center"
android:gravity="center"
android:layout_height="match_parent">
<TextView
android:text="Sample1"
android:layout_gravity="center"
android:gravity="center"
android:textSize="30sp"
android:layout_width="wrap_content"
android:layout_height="wrap_content"
android:id="@+id/tv" />
</LinearLayout>
Add the following code in MainActivity.class
public class MainActivity extends AppCompatActivity {
Toolbar toolbar;
TabLayout tabLayout;
ViewPager viewPager;
@Override
protected void onCreate(Bundle savedInstanceState) {
super.onCreate(savedInstanceState);
setContentView(R.layout.activity_main);
toolbar = (Toolbar) findViewById(R.id.toolbar);
setSupportActionBar(toolbar);
getSupportActionBar().setDisplayHomeAsUpEnabled(true);
viewPager = (ViewPager) findViewById(R.id.viewpager);
setupViewPager(viewPager);
tabLayout = (TabLayout) findViewById(R.id.tabs);
tabLayout.setupWithViewPager(viewPager);
}
@Override
public boolean onCreateOptionsMenu(Menu menu) {
// Inflate the menu; this adds items to the action bar if it is present.
getMenuInflater().inflate(R.menu.menu_main, menu);
return true;
}
private void setupViewPager(ViewPager viewPager) {
ViewPagerAdapter adapter = new ViewPagerAdapter(getSupportFragmentManager());
adapter.addFragment(new Sample1(), "Sample1");
adapter.addFragment(new Sample2(), "Sample2");
adapter.addFragment(new Sample3(), "Sample3");
viewPager.setAdapter(adapter);
}
class ViewPagerAdapter extends FragmentPagerAdapter {
private final List<Fragment> mFragmentList = new ArrayList<Fragment>();
private final List<String> mFragmentTitleList = new ArrayList<>();
public ViewPagerAdapter(FragmentManager manager) {
super(manager);
}
@Override
public Fragment getItem(int position) {
return mFragmentList.get(position);
}
@Override
public int getCount() {
return mFragmentList.size();
}
public void addFragment(Fragment fragment, String title) {
mFragmentList.add(fragment);
mFragmentTitleList.add(title);
}
@Override
public CharSequence getPageTitle(int position) {
return mFragmentTitleList.get(position);
}
}
}
Create Sample1.class, Sample2.class, and Sample3.class which is extended by Fragment and add below code
public class Sample1 extends Fragment {
@Override
public View onCreateView(LayoutInflater inflater, ViewGroup container,
Bundle savedInstanceState) {
return inflater.inflate(R.layout.sample1, container, false);
}
}
public class Sample2 extends Fragment {
@Override
public View onCreateView(LayoutInflater inflater, ViewGroup container,
Bundle savedInstanceState) {
return inflater.inflate(R.layout.sample2, container, false);
}
}
public class Sample3 extends Fragment {
@Override
public View onCreateView(LayoutInflater inflater, ViewGroup container,
Bundle savedInstanceState) {
return inflater.inflate(R.layout.sample3, container, false);
}
}
Now run your Application. See design full tab with swipe view


Leave Comment
1 Comments