Upload file using Ajax form and Modal dialog in ASP.Net MVC
In my previous article, I have explained to you how to use a modal dialog to add, edit, delete and find records in asp.net MVC by using a razor view engine.
In this article, I am going to explain and demonstrate how to upload images by using ajax form and modal dialog in ASP.Net MVC.
To build this sample application you must have basic knowledge of jQuery. I am using entity framework code first model to add and update the information in the database.
1). Open Visual Studio 2010
2). Create a new ASP.Net MVC 4 web application and named it as AjaxFormMVC for this application.
3). Choose Razor as the View and click OK
4). Add a Controller in your project and give name as HomeController.
5). Create a model class in the Model folder as shown below:
Add a connection string in the web.config file under the configuration tag:
  <connectionStrings>

    <add name="ActorDbContext"connectionString="Data Source=.\SQLEXPRESS;Initial Catalog=ActorDb;Integrated Security=true;"providerName="System.Data.SqlClient" />

  </connectionStrings>
Add a Partial View _ActorList.cshtml in Views/Home folder and add the following code in this partial view:
@model IEnumerable<AjaxFormMVC.Models.Actor>

<p>

    @Html.ActionLink("Create New", "Create", null, new { @class = "createActor", title = "Create Actor" })

</p>

<table style="border: 1px solid black;" cellpadding="10">

    <tr>

        <th>

            @Html.DisplayNameFor(model => model.Name)

        </th>

        <th>

            @Html.DisplayNameFor(model => model.Description)

        </th>

        <th>

            @Html.DisplayNameFor(model => model.Image)

        </th>

        <th>

        </th>

    </tr>

    @foreach (var item in Model)

    {

        <tr>

            <td valign="top">

                @Html.DisplayFor(modelItem => item.Name)

            </td>

            <td valign="top">

                @Html.DisplayFor(modelItem => item.Description)

            </td>

            <td valign="top">

                <img src="@Url.Content("~/Content/Actors/" + item.ActorID + "/" + item.Image + "")" alt="@item.Name" width="100px" height="100px" />

            </td>

            <td valign="top">

                @Html.ActionLink("Edit", "Edit", new { id = item.ActorID }, new { @class = "createActor", title = "Edit Actor" })

                |

                @Html.ActionLink("Delete", "Delete", new { id = item.ActorID })

            </td>

        </tr>

    }

</table>
Add a view Index and replace with the code given below.
Must include these three files (jquery-1.7.1.min.js, jquery-ui-1.8.20.min.js, form_ajax.js) under Scripts folder and include themes in the Content folder. Themes folder contain all the necessary CSS files.
@model IEnumerable<AjaxFormMVC.Models.Actor>

@{

    Layout = null;

}

<!DOCTYPE html>

<html>

<head>

    <meta name="viewport" content="width=device-width" />

    <title>Index</title>

    <link href="@Url.Content("~/Content/themes/base/minified/jquery-ui.min.css")" rel="stylesheet" type="text/css" />

    <script src="@Url.Content("~/Scripts/jquery-1.7.1.min.js")" type="text/javascript"></script>

    <script src="@Url.Content("~/Scripts/jquery-ui-1.8.20.min.js")" type="text/javascript"></script>

    <script src="@Url.Content("~/Scripts/form_ajax.js")" type="text/javascript"></script>

    <script type="text/javascript">

        $(document).ready(function () {


            $.ajaxSetup({ cache: false });


            $(".createActor").live("click", function (e) {

                var $url = $(this).attr('href');

                var $title = $(this).attr('title');


                var $dialog = $('<div id="modalDialog"></div>');

                $dialog.empty();

                $dialog.load($url).dialog({

                    autoOpen: false,

                    title: $title,

                    resizable: false,

                    height: 300,

                    width: 380,

                    show: { effect: 'drop', direction: "up" },

                    modal: true,

                    draggable: true

                });

                $dialog.dialog('open');

                return false;

            });


            $("#btncancel").live("click", function (e) {

                $("#modalDialog").dialog('close');

            });

        });

    </script>

</head>

<body>

    <div id="actorList">

        @Html.Partial("_ActorList", Model)

    </div>

</body>

</html>
Add an _Actor.cshtml partial view in the same folder Views\Home and add the following code:
@model AjaxFormMVC.Models.Actor

<script type="text/javascript">

    $(document).ready(function () {

        $('#frmCreateActor').ajaxForm(function () {

            $('#modalDialog').dialog("close");

            $.post('@Url.Action("GetActorList", "Home")', function (data) {

                $("#actorList").html(data);

            });

        })

    });

</script>

@using (Html.BeginForm("Create", "Home", FormMethod.Post, new { @id = "frmCreateActor", @enctype = "multipart/form-data" }))

{

    @Html.ValidationSummary(true)

    <fieldset>

        <legend>Actor</legend>

        <div class="editor-label">

            @Html.LabelFor(model => model.Name)

        </div>

        <div class="editor-field">

            @Html.EditorFor(model => model.Name)

            @Html.ValidationMessageFor(model => model.Name)

        </div>

        <div class="editor-label">

            @Html.LabelFor(model => model.Description)

        </div>

        <div class="editor-field">

            @Html.EditorFor(model => model.Description)

            @Html.ValidationMessageFor(model => model.Description)

        </div>

        <div class="editor-label">

            @Html.LabelFor(model => model.Image)

        </div>

        <div class="editor-field">

            <input type="file" name="imageFile" id="imageFile" />

            @Html.ValidationMessageFor(model => model.Image)

        </div>

        <p>

            @if (ViewBag.IsUpdate !=null && ViewBag.IsUpdate)

            {

                @Html.HiddenFor(model => model.ActorID);

                <input name="cmd" type="submit" value="Update" />

            }

            else

            {

                <input name="cmd" type="submit" value="Create" />

            }

            <input type="button" value="Cancel" id="btncancel" />

        </p>

    </fieldset>

}
Create object of ActorDbContext in HomeController:
ActorDbContext db = new ActorDbContext();
Add the following actions in HomeController:
       public ActionResult Index()

        {

            return View(db.Actors.ToList());

        }

        public ActionResult Create()

        {
            return PartialView("_Actor");
        }

        [HttpPost]

        public ActionResult Create(HttpPostedFileBase imageFile, Actor model, string cmd)

        {

            try

            {

                if (imageFile != null && imageFile.ContentLength > 0)

                {

                    var fileName = Path.GetFileName(imageFile.FileName);

                    if (cmd == "Create")

                    {

                        model.Image = fileName;

                        db.Actors.Add(model);

                        db.SaveChanges();

                    }

                    else

                    {

                        var actor = db.Actors.Where(m => m.ActorID == model.ActorID).FirstOrDefault();

                        if (actor != null)

                        {

                            actor.Image = fileName;

                            db.SaveChanges();

                        }

                    }


                    var path = Path.Combine(Server.MapPath("~/Content/Actors/"), model.ActorID.ToString());

                    if (!Directory.Exists(path))

                        Directory.CreateDirectory(path);

                    imageFile.SaveAs(path + "/" + fileName);

                }

            }

            catch { }


            return RedirectToAction("Index");

        }


        public ActionResult Edit(int id)

        {

            var actor = db.Actors.Where(m => m.ActorID == id).FirstOrDefault();

            ViewBag.IsUpdate = true;

            return PartialView("_Actor", actor);

        }


        public ActionResult Delete(int id)

        {

            var actor = db.Actors.FirstOrDefault(m => m.ActorID == id);

            if (actor != null)

            {

                db.Actors.Remove(actor);

                db.SaveChanges();

            }

            return RedirectToAction("Index");

        }

        public ActionResult GetActorList()

        {
            return PartialView("_ActorList", db.Actors.ToList());
        }
Now, run or debug your application. The application will something look like below:

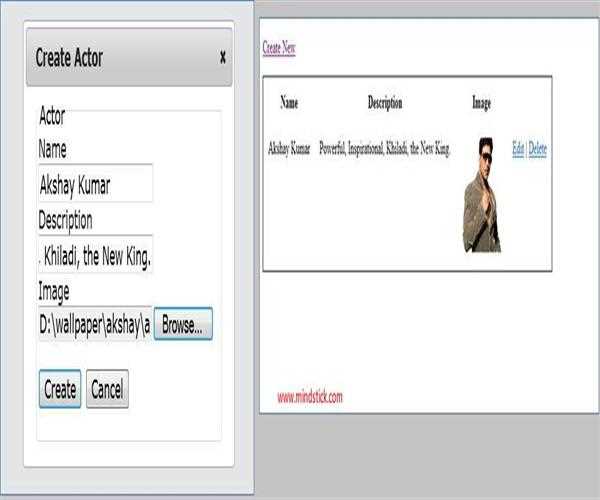
To create a new actor record, click on Create New and enter the information for the actor and browse the image.
When you click on Create button it will add the record both in the database and folder (Content\Actors\{ActorID}\).
The result will something look like the below screenshot after adding the above record.
Same way, you can edit and delete the records of the actor by using Edit and Delete option given in each row.
Thanks for reading this article. You can enter your valuable comments and suggestion to improve this article in the comment box.


Leave a Comment
14 Comments