Remember the travel chaos of arriving in a new country, jet-lagged and disoriented, only to spend the first hour of your vacation hunting for a local SIM card vendor. You’d have to fiddle with a paperclip to eject your tiny tray, carefully store your fragile physical SIM somewhere safe (hoping not to lose it), and then haggle over data prices in a foreign language. That ritual is rapidly becoming a relic of the past. Welcome to the era of the eSIM, a technology that is revolutionizing how we stay connected overseas.
What Is an eSIM?
An eSIM, or "embedded SIM," is exactly what it sounds like: a digital SIM that eliminates the need for a physical plastic card. Instead of inserting a chip into your phone, you download a wireless plan directly onto your device.
For travelers, this is nothing short of a superpower. It allows you to land in a new country and connect to a local mobile network instantly, manage multiple plans simultaneously, and keep your home number active for iMessages or WhatsApp while using local data.
But if you’ve never set one up before, the process can seem a little abstract. Here is your comprehensive guide to setting up an eSIM and ensuring you never suffer from outrageous roaming charges again.
Step 1: Is Your Phone Ready for the Digital Shift?
Before you purchase a data plan, you need to confirm that your hardware is eSIM-compatible. The vast majority of modern smartphones now support eSIMs. This includes the iPhone XS, XR, and all newer models (excluding iPhones sold in mainland China), Google Pixels starting from the Pixel 3, and the most recent Samsung Galaxy S and Z series devices. Many newer iPad and Android tablet models also feature this capability.
To verify your device, you can check your settings. On an iPhone, go to Settings > General > About and look for the Digital SIM or EID (Embedded Identity Document) number. If you see an EID number listed, your device is equipped for eSIM technology.
On Android, the path is usually Settings > Connections > SIM Card Manager. If you see an option to "Add mobile plan," you are good to go. Knowing your version number and device ID is also helpful if you need to check compatibility on a carrier’s website before purchasing a plan.
Step 2: Finding the Perfect eSIM Plan
Once your device is confirmed compatible, you need to purchase a plan from an eSIM provider. There are two main types of providers: your local home carrier (offering international roaming passes) and third-party eSIM storefronts like Airalo, Holafly, or Nomad.
For travelers heading to the United Kingdom, searching for an eSIM UK plan is a fantastic starting point. These providers specialize in offering regional and country-specific packages. When you purchase a plan, you are buying a data bundle (e.g., 5GB for 30 days).
The beauty of these providers is that they connect to local British mobile networks like EE, Vodafone, or O2 the moment you land, ensuring you get fast 5G speeds at local prices rather than expensive international roaming rates.
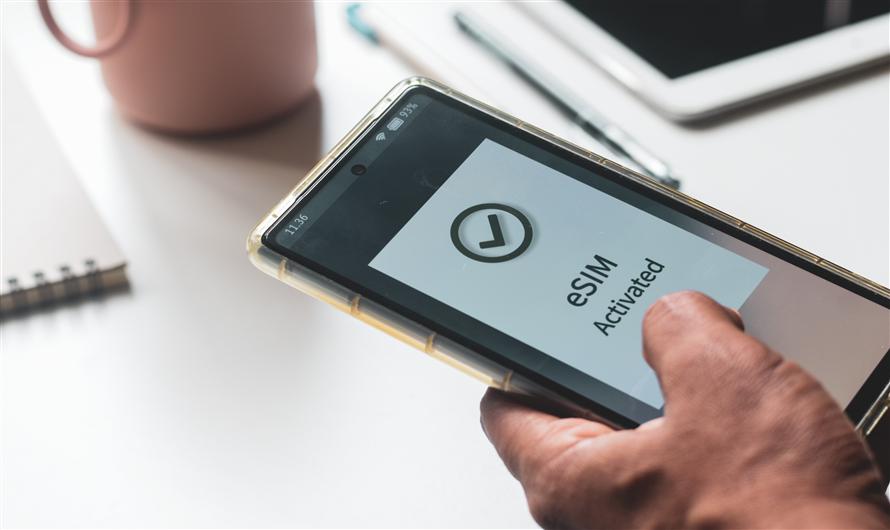
Step 3: The Setup Dance – QR Code vs. Manual Setup
After purchasing your plan online, you will receive your connection details. Typically, this comes in one of two forms: a QR code or manual instructions.
Option A: The QR Code (The Easiest Path)
This is the most common method and is designed for simplicity.
- Ensure you are connected to Wi-Fi (do this before you leave home, or use airport Wi-Fi upon arrival).
- Open your phone’s camera app and scan the QR code provided in your confirmation email.
- A pop-up will appear asking if you want to set up a cellular plan. Tap it.
- You may be prompted to enter an activation code, which is usually included alongside the QR code in your email.
- Hit "Continue" and then label your new plan (e.g., "UK Data"). It’s helpful to label your home physical SIM as "Primary" or "Home."
Option B: Manual Entry (When QR Codes Fail)
Sometimes you might be reading this on a computer, or the QR code simply won’t scan. Don't panic. Every eSIM provider offers a manual fallback. In your email, you will find details like an SM-DP+ address and an activation code.
- Go to your phone's Settings app.
- Navigate to Cellular (or Mobile Data) and tap Add Cellular Plan.
- Select Enter Details Manually (usually found at the bottom of the scan screen).
- Input the SM-DP+ address and the activation code exactly as provided. This manual setup is a bit more tedious, but it achieves the exact same result.

Step 4: Configuring Your Lines for Dual SIM Bliss
Now that the eSIM is installed, you have two active lines: your physical SIM (your home number) and your new digital SIM (your travel data). To make them work harmoniously, you need to set the defaults.
Go to Settings > Cellular (or Mobile Data). You will see both of your plans listed.
- Cellular data: Tap this and select your new travel eSIM. This ensures that all your internet usage (like maps, Instagram, Uber) runs through the local network for apersonalized travel experience.
- Default voice line: Keep this set to your primary physical SIM card. This way, if anyone calls your usual phone number, the call will still come through (though beware of standard call charges; it’s best to use Wi-Fi calling or WhatsApp for voice).
- Turn on data switching: Enable "Allow Cellular Data Switching." This clever feature allows your home physical SIM to use data from your travel eSIM for services like iMessage and Visual Voicemail when you are on a call.
Sometimes, you might need to tweak the APN settings (Access Point Name) for the data to work. This is rare with modern eSIMs, but if you find you have signal but no internet, go to Cellular > Cellular Data Network and input the APN details provided by your eSIM vendor.
The Bottom Line
While having a physical SIM offers a tactile sense of security for some, the flexibility of having your cellular data ready instantly is unmatched. Setting up an eSIM transforms your phone from a potential liability into a seamless travel tool. Just remember to manage your carrier settings by labeling your plans correctly and setting your default data line to the travel eSIM UK package. With this digital passport in your pocket, you’re ready to explore the world without ever losing your signal.


Leave a Comment