# MindStick
> MindStick Software Pvt. Ltd. (www.mindstick.com) is an IT services company and
> developer knowledge hub where developers, students and professionals publish
> technical articles, blogs and news, discuss problems in the forum, and prepare
> with interview questions and quizzes across programming and technology topics.
Content lives at /articles/{id}/{slug}, /blog/{id}/{slug}, /news/{id}/{slug},
/forum/{id}/{slug} and /interview/{id}/{slug}. Append `.md` to one of those URLs
to get a clean Markdown version of that page.
## Browse content
- [Articles](https://www.mindstick.com/developersection/article): in-depth technical articles
- [Blogs](https://www.mindstick.com/developersection/blog): technical blog posts
- [News](https://www.mindstick.com/developersection/news): technology news
- [Forum](https://www.mindstick.com/developersection/forum): developer discussions
- [Interview questions](https://www.mindstick.com/developersection/interview): interview Q&A by topic
- [Beginner tutorials](https://www.mindstick.com/developersection/beginner): articles for beginners
- [Quiz](https://www.mindstick.com/quiz): online tests and quizzes
## Services
- [IT Services overview](https://www.mindstick.com/services): software development and digital services by MindStick
- [Web Development](https://www.mindstick.com/services/web-development)
- [Mobile App Development](https://www.mindstick.com/services/mobile-app-development)
- [Windows Development](https://www.mindstick.com/services/windows-development)
- [Database Development](https://www.mindstick.com/services/database-development)
- [Cloud Development](https://www.mindstick.com/services/cloud-development)
- [UI/UX Development](https://www.mindstick.com/services/ui-ux-development)
- [CMS Development](https://www.mindstick.com/services/cms-software-development)
- [CRM Development](https://www.mindstick.com/services/crm-software-development)
- [ERP Development](https://www.mindstick.com/services/erp-software-development)
- [LMS Development](https://www.mindstick.com/services/lms-software-development)
- [Artificial Intelligence](https://www.mindstick.com/services/artificial-intelligence)
- [AI Tools Integration](https://www.mindstick.com/services/ai-tools-integration)
- [Data Science](https://www.mindstick.com/services/data-science)
- [Blockchain Technology](https://www.mindstick.com/services/blockchain-technology)
- [Search Engine Optimization](https://www.mindstick.com/services/search-engine-optimization)
- [Digital Marketing](https://www.mindstick.com/services/digital-marketing)
- [Content Writing](https://www.mindstick.com/services/content-writing)
- [Business Listing](https://www.mindstick.com/services/business-listing)
- [Startup Promotion](https://www.mindstick.com/services/startup-promotion-service)
## Products
- [Products overview](https://www.mindstick.com/products): software products by MindStick
- [MindStick Cleaner](https://www.mindstick.com/products/cleaner)
- [Data Converter](https://www.mindstick.com/products/data-converter)
- [Import Export](https://www.mindstick.com/products/import-export)
- [Survey Manager](https://www.mindstick.com/products/survey-manager)
- [Unit Converter](https://www.mindstick.com/products/unit-converter)
## Popular articles
- [Login and Registration Form in ASP.Net MVC](https://www.mindstick.com/articles/776/login-and-registration-form-in-asp-dot-net-mvc)
- [Insert, Delete, Update in GridView in ASP.Net using C#](https://www.mindstick.com/articles/974/insert-delete-update-in-gridview-in-asp-dot-net-using-c-sharp)
- [CRUD Operation Using Modal Dialog in ASP.NET MVC](https://www.mindstick.com/articles/1117/crud-operation-using-modal-dialog-in-asp-dot-net-mvc)
- [Print and Print Preview separately using HTML, CSS and JavaScript](https://www.mindstick.com/articles/1103/print-and-print-preview-separately-using-html-css-and-javascript)
- [Editable Grid View System using BootStrap in ASP.Net](https://www.mindstick.com/articles/1385/editable-grid-view-system-using-bootstrap-in-asp-dot-net)
- [Insert, Delete, Update in DataGridView with DataTable in C#](https://www.mindstick.com/articles/965/insert-delete-update-in-datagridview-with-datatable-in-c-sharp)
- [Using ReportViewer in WinForms C#](https://www.mindstick.com/articles/1118/using-reportviewer-in-winforms-c-sharp)
- [Process.Start() in C# with examples](https://www.mindstick.com/articles/628/process-start-in-c-sharp-with-examples)
- [Session Management in ASP.NET MVC](https://www.mindstick.com/articles/1123/session-management-in-asp-dot-net-mvc)
- [Solving IIS 7 Error 503 Service Unavailable](https://www.mindstick.com/articles/998/solving-iis-7-error-503-service-unavailable)
- [Insert, Delete, Update in SQL using web service in ASP.NET](https://www.mindstick.com/articles/1107/insert-delete-update-in-sql-using-web-service-in-asp-dot-net)
- [Read Microsoft Word Document File by using C#](https://www.mindstick.com/articles/629/read-microsoft-word-document-file-by-using-c-sharp)
- [LeadNetwork.com - The Easiest Way to Monetize Your Financial Traffic](https://www.mindstick.com/articles/229009/leadnetwork-com-the-easiest-way-to-monetize-your-financial-traffic)
- [Dynamically loading image in Image control in ASP.NET](https://www.mindstick.com/articles/478/dynamically-loading-image-in-image-control-in-asp-dot-net)
- [The Threading in C# with Example](https://www.mindstick.com/articles/630/the-threading-in-c-sharp-with-example)
- [How to Select Software for Your Business?](https://www.mindstick.com/articles/310973/how-to-select-software-for-your-business)
- [Simple Registration Form using JAVA Swing](https://www.mindstick.com/articles/1799/simple-registration-form-using-java-swing)
- [How to integrate PayPal in Asp.Net](https://www.mindstick.com/articles/1130/how-to-integrate-paypal-in-asp-dot-net)
- [Select Insert Update and Delete using Stored Procedure in ASP.NET MVC4](https://www.mindstick.com/articles/1110/select-insert-update-and-delete-using-stored-procedure-in-asp-dot-net-mvc4)
- [N-Tier Architecture in ASP.NET](https://www.mindstick.com/articles/994/n-tier-architecture-in-asp-dot-net)
## Popular blogs
- [Transferring Data between ASP.NET Web Pages](https://www.mindstick.com/blog/367/transferring-data-between-asp-dot-net-web-pages)
- [How to Create Log File in C#](https://www.mindstick.com/blog/458/how-to-create-log-file-in-c-sharp)
- [Checking IF…ELSE condition in Stored Procedure SQL Server](https://www.mindstick.com/blog/354/checking-if-else-condition-in-stored-procedure-sql-server)
- [Dropdownlist Using BootStrap in ASP.Net](https://www.mindstick.com/blog/639/dropdownlist-using-bootstrap-in-asp-dot-net)
- [Validation Controls in ASP.NET](https://www.mindstick.com/blog/768/validation-controls-in-asp-dot-net)
- [Login Form in Asp.Net MVC 4](https://www.mindstick.com/blog/648/login-form-in-asp-dot-net-mvc-4)
- [Pengangguran Tapi Kaya Raya Ternyata Bandar Togel Beromzet Rp 1M](https://www.mindstick.com/blog/12898/pengangguran-tapi-kaya-raya-ternyata-bandar-togel-beromzet-rp-1m)
- [Abstraction in c# with example](https://www.mindstick.com/blog/319/abstraction-in-c-sharp-with-example)
- [The best 3D printers](https://www.mindstick.com/blog/84290/the-best-3d-printers)
- [Login Status Control in ASP.NET 3.5](https://www.mindstick.com/blog/63/login-status-control-in-asp-dot-net-3-5)
- [Save Image in SqlServer Using C#.](https://www.mindstick.com/blog/184/save-image-in-sqlserver-using-c-sharp)
- [How to Import or Export SQL Server table Data in MS-Excel Sheet Using C# Code](https://www.mindstick.com/blog/294/how-to-import-or-export-sql-server-table-data-in-ms-excel-sheet-using-c-sharp-code)
- [5 Best Short-Term Investments That Will Lead to Big Returns](https://www.mindstick.com/blog/124792/5-best-short-term-investments-that-will-lead-to-big-returns)
- [Application.Exit(), this.Close() and this .Dispose()](https://www.mindstick.com/blog/196/application-exit-this-close-and-this-dispose)
- [Top MS Access Security Issues](https://www.mindstick.com/blog/296751/top-ms-access-security-issues)
- [Difference between MVC 3, MVC 4, MVC 5, and MVC 6](https://www.mindstick.com/blog/722/difference-between-mvc-3-mvc-4-mvc-5-and-mvc-6)
- [Create sql server agent job to run stored procedure](https://www.mindstick.com/blog/11027/create-sql-server-agent-job-to-run-stored-procedure)
- [Article 15 Full Hindi Movie in HD Quality](https://www.mindstick.com/blog/63933/article-15-full-hindi-movie-in-hd-quality)
- [How to display current Time on C# form in Visual Studio 2012](https://www.mindstick.com/blog/562/how-to-display-current-time-on-c-sharp-form-in-visual-studio-2012)
- [Auto Increment id by Using Stored Procedure](https://www.mindstick.com/blog/133/auto-increment-id-by-using-stored-procedure)
## Popular news
- [3 tips to block adult content on X](https://www.mindstick.com/news/3951/3-tips-to-block-adult-content-on-x)
- [ChatGPT’s Sora AI Image Generator Now Free for All Users](https://www.mindstick.com/news/4517/chatgpt-s-sora-ai-image-generator-now-free-for-all-users)
- [Smartphone Bypass Charging: What It Is and When to Use It](https://www.mindstick.com/news/4196/smartphone-bypass-charging-what-it-is-and-when-to-use-it)
- [Starlink Internet's Advantages and Disadvantages](https://www.mindstick.com/news/993/starlink-internet-s-advantages-and-disadvantages)
- [Grok Introduces Memory Feature for Personalized Replies Based on Chat History](https://www.mindstick.com/news/4480/grok-introduces-memory-feature-for-personalized-replies-based-on-chat-history)
- [Meta AI May Access All Your Phone Photos If You’re Not Careful](https://www.mindstick.com/news/4608/meta-ai-may-access-all-your-phone-photos-if-you-re-not-careful)
- [WhatsApp for Windows is being discontinued: Here's what Meta has planned next](https://www.mindstick.com/news/4654/whatsapp-for-windows-is-being-discontinued-here-s-what-meta-has-planned-next)
- [How to mark emails as ‘important’ or ‘urgent’ on Gmail](https://www.mindstick.com/news/3878/how-to-mark-emails-as-important-or-urgent-on-gmail)
- [ChatGPT Now Allows PDF Downloads of Deep Research Reports: Here’s How](https://www.mindstick.com/news/4531/chatgpt-now-allows-pdf-downloads-of-deep-research-reports-here-s-how)
- [India to Keep TikTok Ban in Place, Confirms IT Minister Ashwini Vaishnaw](https://www.mindstick.com/news/4736/india-to-keep-tiktok-ban-in-place-confirms-it-minister-ashwini-vaishnaw)
- [How to set up several WhatsApp accounts on a desktop, as well as other information](https://www.mindstick.com/news/3351/how-to-set-up-several-whatsapp-accounts-on-a-desktop-as-well-as-other-information)
- [Apple MacBook Pro 2026: OLED Display and 2nm M6 Chip Update](https://www.mindstick.com/news/4075/apple-macbook-pro-2026-oled-display-and-2nm-m6-chip-update)
- [Visual Studio 2022 introduces the new Razor editor.](https://www.mindstick.com/news/974/visual-studio-2022-introduces-the-new-razor-editor)
- [WhatsApp Tests Liquid Glass Design for iPhone Ahead of iPhone 17 Launch](https://www.mindstick.com/news/4734/whatsapp-tests-liquid-glass-design-for-iphone-ahead-of-iphone-17-launch)
- [WhatsApp Introduces Default Media Upload Quality Settings for Android Users](https://www.mindstick.com/news/4478/whatsapp-introduces-default-media-upload-quality-settings-for-android-users)
- [YouTube Expands Multi-Language Audio Dubbing for All Creators](https://www.mindstick.com/news/4739/youtube-expands-multi-language-audio-dubbing-for-all-creators)
- [Meta Launches AI-Powered Ad Tools to Drive Festive Season Sales in India](https://www.mindstick.com/news/4732/meta-launches-ai-powered-ad-tools-to-drive-festive-season-sales-in-india)
- [Whistleblower Sues Meta Alleging Security Flaws in WhatsApp](https://www.mindstick.com/news/4737/whistleblower-sues-meta-alleging-security-flaws-in-whatsapp)
- [OpenAI Unveils AI-First Jobs Platform to Take On LinkedIn](https://www.mindstick.com/news/4731/openai-unveils-ai-first-jobs-platform-to-take-on-linkedin)
- [Adobe to Launch Free Premiere Video Editor with Pro Tools on iPhone This Month](https://www.mindstick.com/news/4735/adobe-to-launch-free-premiere-video-editor-with-pro-tools-on-iphone-this-month)
## Popular forum discussions
- [Top Programming Languages to Learn for AI Development](https://www.mindstick.com/forum/162093/top-programming-languages-to-learn-for-ai-development)
- [How can you perform sentiment analysis using C# and ML.NET?](https://www.mindstick.com/forum/162092/how-can-you-perform-sentiment-analysis-using-c-sharp-and-ml-dot-net)
- [What is the role of IDataView in ML.NET?](https://www.mindstick.com/forum/162091/what-is-the-role-of-idataview-in-ml-dot-net)
- [Memory Optimization Techniques in Ollama](https://www.mindstick.com/forum/162090/memory-optimization-techniques-in-ollama)
- [How to convert OST Files into PST Format?](https://www.mindstick.com/forum/162083/how-to-convert-ost-files-into-pst-format)
- [What is the difference between Artificial Intelligence and Machine Learning?](https://www.mindstick.com/forum/161469/what-is-the-difference-between-artificial-intelligence-and-machine-learning)
- [How can Generative AI models be misused to create realistic fake audio using speech recognition data](https://www.mindstick.com/forum/161481/how-can-generative-ai-models-be-misused-to-create-realistic-fake-audio-using-speech-recognition-data)
- [How to convert PST files into EML Format?](https://www.mindstick.com/forum/162086/how-to-convert-pst-files-into-eml-format)
- [Stake Clone App Development for iOS, Android & Web Platforms](https://www.mindstick.com/forum/162084/stake-clone-app-development-for-ios-android-web-platforms)
- [Why is SEO important?](https://www.mindstick.com/forum/161664/why-is-seo-important)
- [How does local SEO optimization help businesses attract nearby customers?](https://www.mindstick.com/forum/161135/how-does-local-seo-optimization-help-businesses-attract-nearby-customers)
- [Explain how a Generative Adversarial Network (GAN) works.](https://www.mindstick.com/forum/160782/explain-how-a-generative-adversarial-network-gan-works)
- [What are best practices for building scalable SaaS applications in ReactJS?](https://www.mindstick.com/forum/162016/what-are-best-practices-for-building-scalable-saas-applications-in-reactjs)
- [How do you create an API in ASP.NET Core?](https://www.mindstick.com/forum/161641/how-do-you-create-an-api-in-asp-dot-net-core)
- [What is the difference between string and StringBuilder?](https://www.mindstick.com/forum/161763/what-is-the-difference-between-string-and-stringbuilder)
- [How can vector databases optimize semantic search?](https://www.mindstick.com/forum/162041/how-can-vector-databases-optimize-semantic-search)
- [What are indexers in C#?](https://www.mindstick.com/forum/161762/what-are-indexers-in-c-sharp)
- [What is a delegate? How is it different from an event?](https://www.mindstick.com/forum/161764/what-is-a-delegate-how-is-it-different-from-an-event)
- [Difference between COALESCE vs ISNULL.](https://www.mindstick.com/forum/162078/difference-between-coalesce-vs-isnull)
- [Difference between EXISTS vs IN.](https://www.mindstick.com/forum/162077/difference-between-exists-vs-in)
## Popular interview questions
- [How can you use Microsoft ML.NET for machine learning in C#?](https://www.mindstick.com/interview/34526/how-can-you-use-microsoft-ml-dot-net-for-machine-learning-in-c-sharp)
- [CPU vs GPU Performance in Ollama](https://www.mindstick.com/interview/34525/cpu-vs-gpu-performance-in-ollama)
- [How to create Miscellaneous file Detector?](https://www.mindstick.com/interview/34521/how-to-create-miscellaneous-file-detector)
- [How to create Image file validator in production grade.](https://www.mindstick.com/interview/34520/how-to-create-image-file-validator-in-production-grade)
- [What are the core components of an AI system?](https://www.mindstick.com/interview/34518/what-are-the-core-components-of-an-ai-system)
- [Explain real-world use cases of AI and ML in enterprise .NET applications.](https://www.mindstick.com/interview/34517/explain-real-world-use-cases-of-ai-and-ml-in-enterprise-dot-net-applications)
- [Top AI software development companies in Eastern Europe](https://www.mindstick.com/interview/34498/top-ai-software-development-companies-in-eastern-europe)
- [What is ONNX, and how can it be integrated into .NET applications?](https://www.mindstick.com/interview/34516/what-is-onnx-and-how-can-it-be-integrated-into-dot-net-applications)
- [How to create Agants using Claude CoWork?](https://www.mindstick.com/interview/34515/how-to-create-agants-using-claude-cowork)
- [Best AI tool for Image generation.](https://www.mindstick.com/interview/34514/best-ai-tool-for-image-generation)
- [How to use Ollama in my system?](https://www.mindstick.com/interview/34513/how-to-use-ollama-in-my-system)
- [How do you identify missing indexes?](https://www.mindstick.com/interview/34512/how-do-you-identify-missing-indexes)
- [Difference between FUNCTION vs TRIGGER?](https://www.mindstick.com/interview/34511/difference-between-function-vs-trigger)
- [Difference Between UNION vs JOIN in SQL](https://www.mindstick.com/interview/34510/difference-between-union-vs-join-in-sql)
- [What is Difference between NOT IN vs NOT EXISTS?](https://www.mindstick.com/interview/34508/what-is-difference-between-not-in-vs-not-exists)
- [Difference Between GETDATE() vs CURRENT_TIMESTAMP.](https://www.mindstick.com/interview/34507/difference-between-getdate-vs-current_timestamp)
- [Difference between COUNT(*) vs COUNT(column).](https://www.mindstick.com/interview/34506/difference-between-count-vs-count-column)
- [Difference between IDENTITY vs SEQUENCE.](https://www.mindstick.com/interview/34504/difference-between-identity-vs-sequence)
- [Difference between RANK() vs DENSE_RANK().](https://www.mindstick.com/interview/34502/difference-between-rank-vs-dense_rank)
- [What is difference between INDEX SEEK vs INDEX SCAN?](https://www.mindstick.com/interview/34501/what-is-difference-between-index-seek-vs-index-scan)
## Help & information
- [About](https://www.mindstick.com/home/aboutus): what MindStick Software Pvt. Ltd. is
- [Contact](https://www.mindstick.com/contactus): contact and feedback
- [Help Center / FAQ](https://www.mindstick.com/help/help-center): frequently asked questions
## Optional
- [Privacy Policy](https://www.mindstick.com/home/privacypolicy)
- [Terms & Conditions](https://www.mindstick.com/home/termsandconditions)
- [Cookie Policy](https://www.mindstick.com/cookie-policy)
- [Press Releases](https://www.mindstick.com/home/press-release)
---
# Full content
## Login and Registration Form in ASP.Net MVC
URL: https://www.mindstick.com/articles/776/login-and-registration-form-in-asp-dot-net-mvc
## Login and Registration Form in ASP.Net MVC
In this Article, I will show how to create a [Login and Registration](https://www.mindstick.com/articles/1117/crud-operation-using-modal-dialog-in-asp-dot-net-mvc) form in ASP.Net MVC. This is a quick simple example of how to implement it in the ASP.NET MVC project.\
## Before implementing the steps given below create a table in your database as I
## have created for this project:
```
create table mvcUser
(
FirstName varchar(50),
LastName varchar(50),
userID varchar(50) constraint mvcPrime primary key,
PasswordConfirm varchar(30),
StreetAddress1 varchar(100),
StreetAddress2 varchar(100),
City varchar(50),
State varchar(50),
ZIPCode varchar(20)
)
```
Please implement the following steps to create a Login and Registration Form:\
Open Microsoft Visual Studio 2010 à Select New Project Select Web from the Installed Templates => Select ASP.NET MVC 3 Web Application à Enter the project name “UserFormDemo” in the Name textbox =>Click OK.\
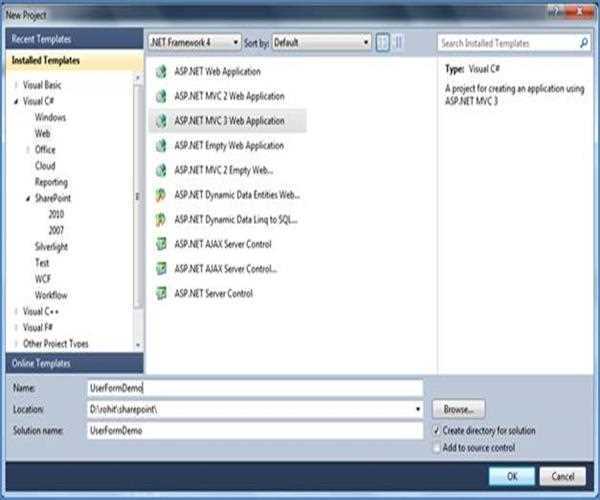
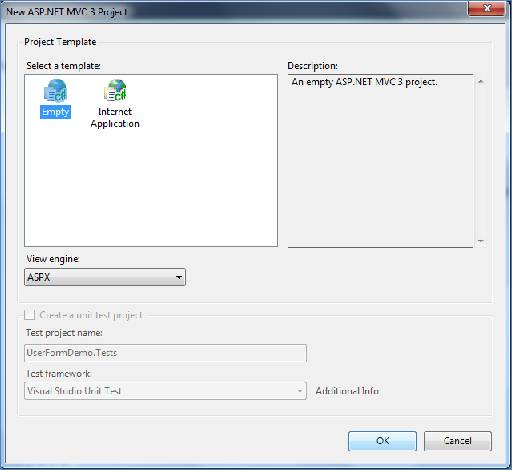
After selecting the project you can see the following (New ASP.NET MVC 3 Project)
dialog box : Select Empty from the Select a template option à Select ASPX view engine à Click OK.
\
Add a new Controller in your project and enter the controller name as “HomeController” as shown in the below figure
: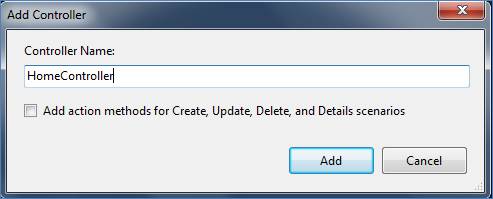\
After adding a controller add a Model in your project and enter the model class name as “Login.cs”.
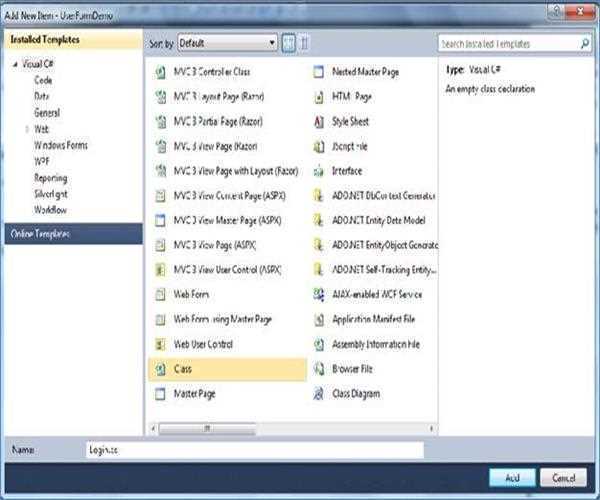\
You also have to configure your web.config and Global.asax file for the implementation of this project:
Add the connectionStrings element under the configuration tag
and authentication element under the system.web tag.
```
```
Change the RegisterRoutes definition in Global.asax file as show below :
```
public static void RegisterRoutes(RouteCollection routes)
{
routes.IgnoreRoute("{resource}.axd/{*pathInfo}");
routes.MapRoute(
"Default", // Route name
"{controller}/{action}/{id}", // URL with parameters
new { controller = "Home", action = "LogOn", id = UrlParameter.Optional }
);
}
```
In the Model class adds the properties, methods, and class as I did in the below Model (Login) class:\
```
using System;
using System.Web;
using System.ComponentModel.DataAnnotations;
using System.ComponentModel;
using System.Data.SqlClient;
using System.Web.Mvc;
using System.Drawing;
using System.Drawing.Imaging;
using System.Drawing.Text;
namespace UserFormDemo.Models
{
public class Login
{
[Required(ErrorMessage = "Email Id Required")]
[DisplayName("Email ID")]
[RegularExpression(@"^\w+([-+.']\w+)*@\w+([-.]\w+)*\.\w+([-.]\w+)*$",
ErrorMessage = "Email Format is wrong")]
[StringLength(50, ErrorMessage = "Less than 50 characters")]
public string EmailId
{
get; set;
}
[DataType(DataType.Password)]
[Required(ErrorMessage="Password Required")]
[DisplayName("Password")]
[StringLength(30, ErrorMessage = ":Less than 30 characters")]
public string Password
{
get; set;
}
public bool IsUserExist(string emailid, string password)
{
bool flag = false;
SqlConnection connection = new SqlConnection(
System.Configuration.ConfigurationManager.ConnectionStrings["cs"].ConnectionString);
connection.Open();
SqlCommand command = new SqlCommand("select count(*) from mvcUser where
userID='"
userID='" + emailid + "' and PasswordConfirm='" + password + "'", connection);
flag = Convert.ToBoolean(command.ExecuteScalar());
connection.Close();
return flag;
}
}
public class Register
{
[Required(ErrorMessage="FirstName Required:")]
[DisplayName("First Name:")]
[RegularExpression(@"^[a-zA-Z'.\s]{1,40}$",ErrorMessage="Special Characters not
allowed"
allowed")]
[StringLength(50, ErrorMessage = "Less than 50 characters")]
public string FirstName { get; set; }
[Required(ErrorMessage="LastName Required:")]
[RegularExpression(@"^[a-zA-Z'.\s]{1,40}$", ErrorMessage = "Special Characters
not allowed"
not allowed")]
[DisplayName("Last Name:")]
[StringLength(50, ErrorMessage = "Less than 50 characters")]
public string LastName { get; set; }
[Required(ErrorMessage="EmailId Required:")]
[DisplayName("Email Id:")]
[RegularExpression(@"^\w+([-+.']\w+)*@\w+([-.]\w+)*\.\w+([-.]\w+)*$",
ErrorMessage = "Email Format is wrong")]
[StringLength(50, ErrorMessage = "Less than 50 characters")]
public string EmailId { get; set; }
[Required(ErrorMessage="Password Required:")]
[DataType(DataType.Password)]
[DisplayName("Password:")]
[StringLength(30, ErrorMessage = "Less than 30 characters")]
public string Password { get; set; }
[Required(ErrorMessage="Confirm Password Required:")]
[DataType(DataType.Password)]
[Compare("Password", ErrorMessage = "Confirm not matched.")]
[Display(Name = "Confirm password:")]
[StringLength(30, ErrorMessage = "Less than 30 characters")]
public string ConfirmPassword { get; set; }
[Required(ErrorMessage="Street Address Required")]
[DisplayName("Street Address1:")]
[StringLength(100, ErrorMessage = "Less than 100 characters")]
public string StreetAdd1 { get; set; }
[DisplayName("Street Address2:")]
[StringLength(100, ErrorMessage = "Less than 100 characters")]
public string StreetAdd2 { get; set; }
[Required(ErrorMessage="City Required")]
[DisplayName("City:")]
[RegularExpression(@"^[a-zA-Z'.\s]{1,40}$", ErrorMessage = "Special Characters
not allowed"
not allowed")]
[StringLength(50, ErrorMessage = "Less than 50 characters")]
public string City { get; set; }
[Required(ErrorMessage="State Required")]
[DisplayName("State:")]
[RegularExpression(@"^[a-zA-Z'.\s]{1,40}$", ErrorMessage = "Special Characters
not allowed"
not allowed")]
[StringLength(50, ErrorMessage = "Less than 50 characters")]
public string State { get; set; }
[Required(ErrorMessage="ZipCode Required")]
[DisplayName("Zip Code:")]
[StringLength(20, ErrorMessage = "Less than 20 characters")]
public string Zip { get; set; }
[Required(ErrorMessage = "Enter Verification Code")]
[DisplayName("Verification Code:")]
public string Captcha { get; set; }
public bool IsUserExist(string emailid)
{
bool flag = false;
SqlConnection connection = new SqlConnection
(System.Configuration.ConfigurationManager.ConnectionStrings["cs"].ConnectionString);
connection.Open();
SqlCommand command = new SqlCommand("select count(*) from mvcUser where
userID='"
userID='" + emailid + "'", connection);
flag = Convert.ToBoolean(command.ExecuteScalar());
connection.Close();
return flag;
}
public bool Insert()
{
bool flag = false;
if (!IsUserExist(EmailId))
{
SqlConnection connection = new SqlConnection
(System.Configuration.ConfigurationManager.ConnectionStrings["cs"].ConnectionString);
connection.Open();
SqlCommand command = new SqlCommand("insert into mvcUser values('" +
FirstName + "','" + LastName + "','" + EmailId + "','" + Password + "',
'"
'" + StreetAdd1 + "','" + StreetAdd2 + "','" + City + "','" + State +"',
'"
'" + Zip + "')", connection);
flag = Convert.ToBoolean(command.ExecuteNonQuery());
connection.Close();
return flag;
}
return flag;
}
}
public class CaptchImageAction : ActionResult
{
public Color BackgroundColor { get; set; }
public Color RandomTextColor { get; set; }
public string RandomText { get; set; }
public override void ExecuteResult(ControllerContext context)
{
RenderCaptchaImage(context);
}
private void RenderCaptchaImage(ControllerContext context)
{
Bitmap objBmp = new Bitmap(150, 60);
Graphics objGraphic=Graphics.FromImage(objBmp);
objGraphic.Clear(BackgroundColor);
SolidBrush objBrush = new SolidBrush(RandomTextColor);
Font objFont = null;
int a;
string myFont, str;
string[] crypticsFont = new string[11];
crypticsFont[0] = "Times New roman";
crypticsFont[1] = "Verdana";
crypticsFont[2] = "Sylfaen";
crypticsFont[3] = "Microsoft Sans Serif";
crypticsFont[4] = "Algerian";
crypticsFont[5] = "Agency FB";
crypticsFont[6] = "Andalus";
crypticsFont[7] = "Cambria";
crypticsFont[8] = "Calibri";
crypticsFont[9] = "Courier";
crypticsFont[10] = "Tahoma";
for (a = 0; a < RandomText.Length; a++)
{
myFont = crypticsFont[a];
objFont=new Font(myFont,18,FontStyle.Bold | FontStyle.Italic |
FontStyle.Strikeout);
str=RandomText.Substring(a,1);
objGraphic.DrawString(str,objFont,objBrush,a*20,20);
objGraphic.Flush();
}
context.HttpContext.Response.ContentType="image/GF";
objBmp.Save(context.HttpContext.Response.OutputStream,ImageFormat.Gif);
objFont.Dispose();
objGraphic.Dispose();
objBmp.Dispose();
}
}
}
```
Add the following Views and methods in the Controller class:
```
using System;
using System.Web.Mvc;
using System.Web.Security;
using System.Drawing;
using System.Text;
using UserFormDemo.Models;
namespace MvcApplication.Controllers
{
public class HomeController : Controller
{
public ViewResult LogOn()
{
return View();
}
public ViewResult Register()
{
return View();
}
public ActionResult Home()
{
return View();
}
[HttpPost, ValidateInput(false)]
public ActionResult LogOn(Login model)
{
if (ModelState.IsValid)
{
if (model.IsUserExist(model.EmailId, model.Password))
{
ViewBag.UserName = model.EmailId;
FormsAuthentication.RedirectFromLoginPage(model.EmailId, false);
}
else
{
ModelState.AddModelError("", "EmailId or Password Incorrect.");
}
}
return View(model);
}
[HttpPost, ValidateInput(false)]
public ActionResult Register(Register model)
{
if (ModelState.IsValid)
{
string realCaptcha = Session["captcha"].ToString();
if (model.Captcha == realCaptcha)
{
if (model.Insert())
{
return RedirectToAction("LogOn", "Home");
}
else
{
ModelState.AddModelError("", "Email Id Already Exist");
}
}
else
ModelState.AddModelError("", "Verification Code is Incorrect");
}
return View(model);
}
public CaptchImageAction Image()
{
string randomText = SelectRandomWord(6);
Session["captcha"] = randomText;
HttpContext.Session["RandomText"] = randomText;
return new CaptchImageAction() { BackgroundColor = Color.LightGray,
RandomTextColor = Color.Black, RandomText = randomText };
}
private string SelectRandomWord(int numberOfChars)
{
if (numberOfChars > 36)
{
throw new InvalidOperationException("Random Word Characters cannot be
greater than 36"
greater than 36");
}
char[] columns = new char[36];
for (int charPos = 65; charPos < 65 + 26; charPos++)
columns[charPos - 65] = (char)charPos;
for (int intPos = 48; intPos <= 57; intPos++)
columns[26 + (intPos - 48)] = (char)intPos;
StringBuilder randomBuilder = new StringBuilder();
Random randomSeed = new Random();
for (int incr = 0; incr < numberOfChars; incr++)
{
randomBuilder.Append(columns[randomSeed.Next(36)].ToString());
}
return randomBuilder.ToString();
}
}
}
```
After establishing the code you have to add **Master Page** and **Views** in your\
project to present the user interface : **Adding a Master Page:**
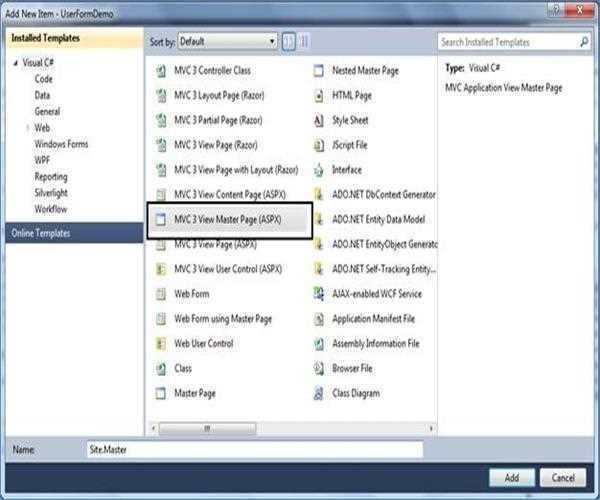
Right-click on **Shared Folder** =>Add New Item => Select **MVC 3 view Master Page**
**(ASPX)** => Enter the **Site.Master** in the Name textbox => Click Add.
##### Add the following content in Master Page (Site.Master):
```
<asp:ContentPlaceHolder ID="TitleContent" runat="server" />
```
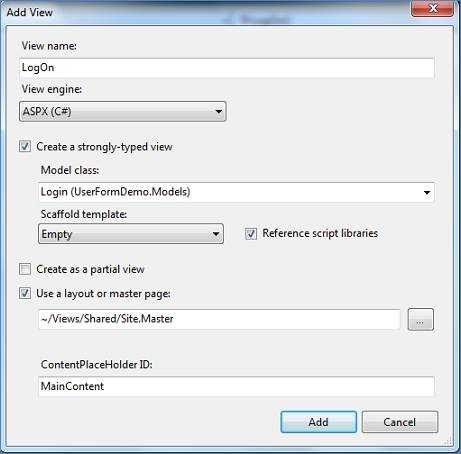
Add a view:
- Enter View name as LogOn.
- Select the Login class as a strongly typed view.
- Select Site.master as your master page.
Add the following content in your LogOn View source page:
```
LogOn
<%using (Html.BeginForm("LogOn", "Home", FormMethod.Post))
{ %>
<%: Html.LabelFor(m => m.EmailId) %>
<%: Html.TextBoxFor(m => m.EmailId)%>
<%: Html.ValidationMessageFor(m => m.EmailId)%>
<%:Html.LabelFor(m => m.Password) %>
<%: Html.PasswordFor(m => m.Password)%>
<%: Html.ValidationMessageFor(m => m.Password) %>
<%: Html.ValidationSummary(true)%>
<%} %>
```
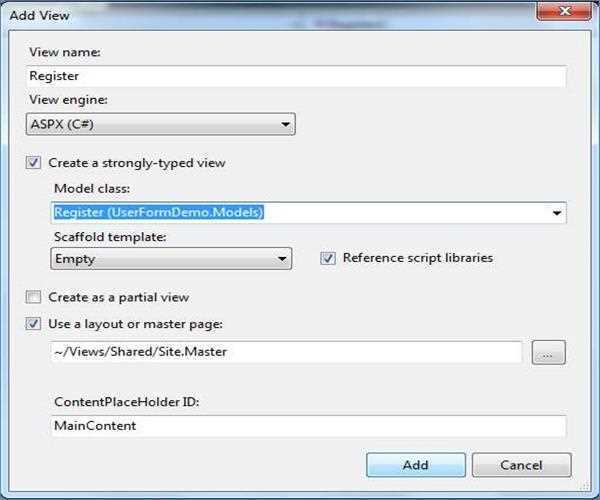
Add a view: \
- Enter View name as Register.
- Select the Register class as a strongly typed view.
- Select Site.master as your master page.
Add the following content in your Register View source page:
```
Register
<%using (Html.BeginForm("Register", "Home", FormMethod.Post))
{ %>
<%} %>
```
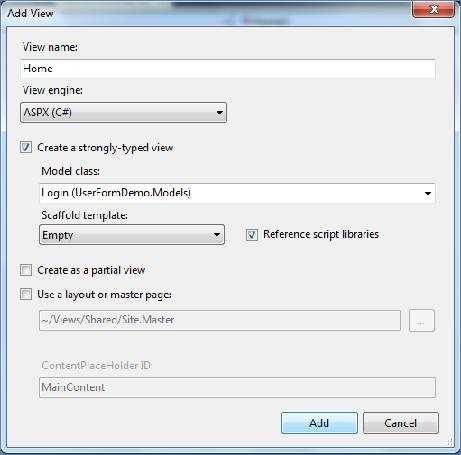
Add a view:
- Enter View name as **Home**
- Select the Login class as a strongly typed view.
Add the following content in your Home View source page:
```
Home
Welcome User!
```
Now both coding and design part is over. Now when you debug or run your project you will have the following screen from which the user can log in if he had registered in the database.
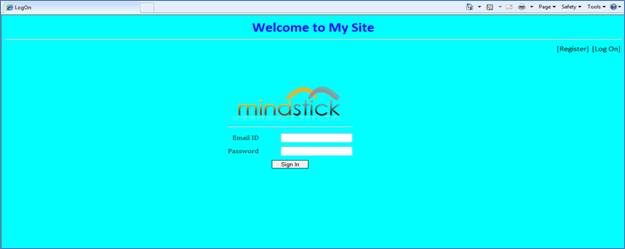
When you click on the Register link, a registration page will open from where user can be registered:
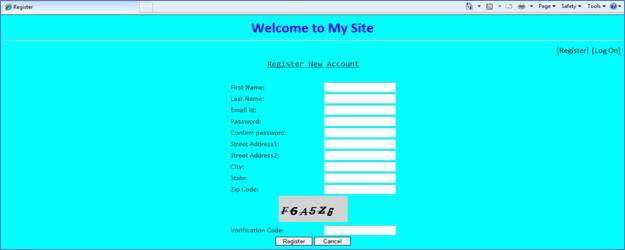\
After creating or registering an account when user login he will get the following page with a welcome message:
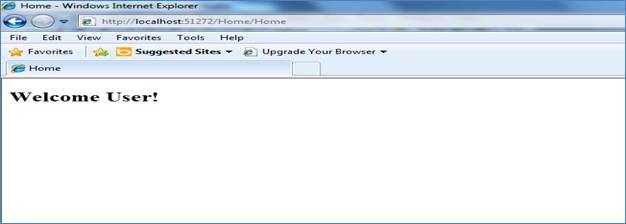
\
## Insert, Delete, Update in GridView in ASP.Net using C#
URL: https://www.mindstick.com/articles/974/insert-delete-update-in-gridview-in-asp-dot-net-using-c-sharp
## Insert, Delete, Update in GridView in ASP.Net using C#
The ASP.NET GridView is a very common and useful control. Here, I’m explaining how to work with GridView control in ASP.NET, like **[how to insert, delete and update records in GridView control](https://www.mindstick.com/articles/1117/crud-operation-using-modal-dialog-in-asp-dot-net-mvc)**.
Follow the below steps to know how to work with GridView in ASP.NET.\
**Step 1:-** Create a Database in SqlServer and create a table within this database. For demonstration here I have created a database named “Demo” and a table named “**GridView**”
```
CREATE DATABASE DEMOGO USE DEMOGO CREATE TABLE GridView(id INT PRIMARY KEY IDENTITY,name VARCHAR (50) NOT NULL,age INT NOT NULL,salary FLOAT NOT NULL,country VARCHAR(50) NOT NULL,city VARCHAR(50) NOT NULL,photopath VARCHAR(500) NULL)GO
```
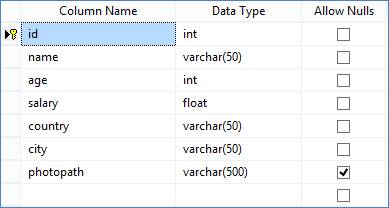
**Note:** Here “id” column is auto increment and primary key.
**Step 2**:- Add connection string in your application’s web.config file and change name and connectionString according to your SQL Server configuration as following.
```
```
**Step 3**:- Drag & drop GridView control from Toolboxon “**.****aspx**” page and write down the following line of code within **** section or simply copy the following line of code and put where you want to display GridView.
```
Id'> Name'> ' MaxLength="50"> Age'> ' MaxLength="2"> Salary'> ' MaxLength="10"> Country'> ' MaxLength="20"> City'> ' MaxLength="20"> Photo' /> Operation No record available
```
**Step 4:-**Create one class within the **App_Code** folder.
Here I have given this class named is GlobalClass and write the following line of code.
```
using System.Data;using System.Data.SqlClient; public class GlobalClass{ public static SqlDataAdapter adap; public static DataTable dt; // Stored image path before updating the record public static string imgEditPath;}
```
**Step 5**:- Create one folder, named Images, where we have stored employee's photos see in the following image.
\
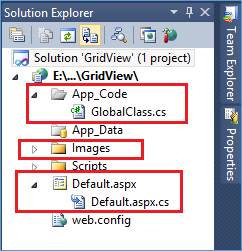
**Step 6:-** Write down following line of code in “.cs” page which related to your .aspx page (e.g. if your .aspx page name is default.aspx then your .cs file is default.aspx.cs).
```
using System;using System.Data;using System.Data.SqlClient;using System.Configuration;using System.Web.UI.WebControls;using System.IO; public partial class _Default : System.Web.UI.Page{ protected void Page_Load(object sender, EventArgs e) { if (!IsPostBack) { // Call FillGridView Method FillGridView(); } } /// /// Fill record into GridView /// public void FillGridView() { try { string cnString = ConfigurationManager.ConnectionStrings["dbconnection"].ConnectionString; SqlConnection con = new SqlConnection(cnString); GlobalClass.adap = new SqlDataAdapter("select * from gridview", con); SqlCommandBuilder bui = new SqlCommandBuilder(GlobalClass.adap); GlobalClass.dt = new DataTable(); GlobalClass.adap.Fill(GlobalClass.dt); GridView1.DataSource
= GlobalClass.dt; GridView1.DataBind(); } catch { Response.Write(""); } } /// /// Edit record /// /// /// protected void editRecord(object sender, GridViewEditEventArgs e) { // Get the image path for remove old image after
update record Image imgEditPhoto = GridView1.Rows[e.NewEditIndex].FindControl("imgPhoto") as Image; GlobalClass.imgEditPath = imgEditPhoto.ImageUrl; // Get the current row index for edit record GridView1.EditIndex
= e.NewEditIndex; FillGridView(); } /// /// Cancel the operation (e.g. edit) /// /// /// protected void cancelRecord(object sender, GridViewCancelEditEventArgs e) { GridView1.EditIndex
= -1; FillGridView(); } /// /// Add new row into DataTable if no record found in Table /// /// /// protected void AddNewRecord(object sender, EventArgs e) { try { if (GlobalClass.dt.Rows.Count > 0) { GridView1.EditIndex
= -1; GridView1.ShowFooter
= true; FillGridView(); } else { GridView1.ShowFooter
= true; DataRow dr = GlobalClass.dt.NewRow(); dr["name"] = "0"; dr["age"] = 0;
dr["salary"] = 0; dr["country"] = "0"; dr["city"] = "0"; dr["photopath"] = "0"; GlobalClass.dt.Rows.Add(dr); GridView1.DataSource
= GlobalClass.dt; GridView1.DataBind(); GridView1.Rows[0].Visible
= false; } } catch { Response.Write(""); } } /// /// Cancel new added record /// /// /// protected void AddNewCancel(object sender, EventArgs e) { GridView1.ShowFooter
= false; FillGridView(); } /// /// Insert New Record /// /// /// protected void InsertNewRecord(object sender, EventArgs e) { try { string strName = GlobalClass.dt.Rows[0]["name"].ToString(); if (strName == "0") { GlobalClass.dt.Rows[0].Delete(); GlobalClass.adap.Update(GlobalClass.dt); } TextBox txtName = GridView1.FooterRow.FindControl("txtNewName") as TextBox; TextBox txtAge = GridView1.FooterRow.FindControl("txtNewAge") as TextBox; TextBox txtSalary = GridView1.FooterRow.FindControl("txtNewSalary") as TextBox; TextBox txtCountry = GridView1.FooterRow.FindControl("txtNewCountry") as TextBox; TextBox txtCity = GridView1.FooterRow.FindControl("txtNewCity") as TextBox; FileUpload fuPhoto = GridView1.FooterRow.FindControl("fuNewPhoto") as FileUpload; Guid FileName = Guid.NewGuid(); fuPhoto.SaveAs(Server.MapPath("~/Images/" + FileName + ".png")); DataRow dr = GlobalClass.dt.NewRow(); dr["name"] = txtName.Text.Trim(); dr["age"] = txtAge.Text.Trim(); dr["salary"] = txtSalary.Text.Trim(); dr["country"] = txtCountry.Text.Trim(); dr["city"] = txtCity.Text.Trim(); dr["photopath"] = "~/Images/" + FileName + ".png"; GlobalClass.dt.Rows.Add(dr); GlobalClass.adap.Update(GlobalClass.dt); GridView1.ShowFooter
= false; FillGridView(); } catch { Response.Write(""); } } /// /// Update the record /// /// /// protected void updateRecord(object sender, GridViewUpdateEventArgs e) { try { TextBox txtName = GridView1.Rows[e.RowIndex].FindControl("txtName") as TextBox; TextBox txtAge = GridView1.Rows[e.RowIndex].FindControl("txtAge") as TextBox; TextBox txtSalary = GridView1.Rows[e.RowIndex].FindControl("txtSalary") as TextBox; TextBox txtCountry = GridView1.Rows[e.RowIndex].FindControl("txtCountry") as TextBox; TextBox txtCity = GridView1.Rows[e.RowIndex].FindControl("txtCity") as TextBox; FileUpload fuPhoto = GridView1.Rows[e.RowIndex].FindControl("fuPhoto") as FileUpload; Guid FileName = Guid.NewGuid(); if (fuPhoto.FileName != "") { fuPhoto.SaveAs(Server.MapPath("~/Images/" + FileName + ".png")); GlobalClass.dt.Rows[GridView1.Rows[e.RowIndex].RowIndex]["photopath"] = "~/Images/" + FileName + ".png"; File.Delete(Server.MapPath(GlobalClass.imgEditPath)); } GlobalClass.dt.Rows[GridView1.Rows[e.RowIndex].RowIndex]["name"] = txtName.Text.Trim(); GlobalClass.dt.Rows[GridView1.Rows[e.RowIndex].RowIndex]["age"] = Convert.ToInt32(txtAge.Text.Trim()); GlobalClass.dt.Rows[GridView1.Rows[e.RowIndex].RowIndex]["salary"] = Convert.ToInt32(txtSalary.Text.Trim()); GlobalClass.dt.Rows[GridView1.Rows[e.RowIndex].RowIndex]["country"] = txtCountry.Text.Trim(); GlobalClass.dt.Rows[GridView1.Rows[e.RowIndex].RowIndex]["city"] = txtCity.Text.Trim(); GlobalClass.adap.Update(GlobalClass.dt); GridView1.EditIndex
= -1; FillGridView(); } catch { Response.Write(""); } } /// /// Delete Record /// /// /// protected void RowDeleting(object sender, GridViewDeleteEventArgs e) { try { GlobalClass.dt.Rows[GridView1.Rows[e.RowIndex].RowIndex].Delete(); GlobalClass.adap.Update(GlobalClass.dt); // Get the image path for removing deleted's
record image from server folder Image imgPhoto = GridView1.Rows[e.RowIndex].FindControl("imgPhoto") as Image; File.Delete(Server.MapPath(imgPhoto.ImageUrl)); FillGridView(); } catch { Response.Write(""); } }}
```
**Step 7:-** Now, save and build your application and execute. Your application output display as following.
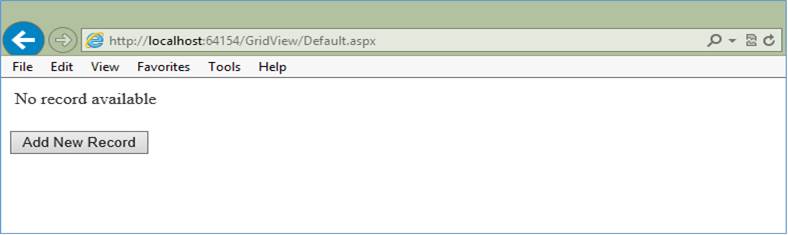
It’s your application first screen. Because there is no data in a table so it displaces the message “**[No record available](https://www.mindstick.com/Articles/444/conjunctions-and-dis-junctions-in-sql-server)**”.
**Step 8:-** For inserting data, click on the button “**[Add New Record](https://www.mindstick.com/Articles/1120/upload-file-using-ajax-form-and-modal-dialog-in-asp-dot-net-mvc)**”. Now fill the data. Every control has validation for prohibited wrong input.
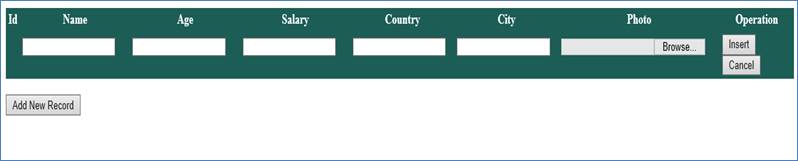
After filling data, your GridView looking as following. Here I have inserted three records.
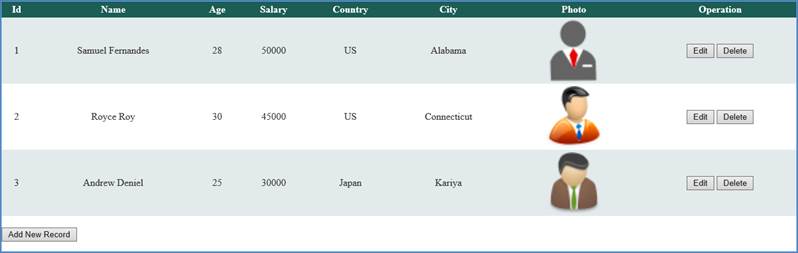
##### Note: - Id is generated automatically for every new record.
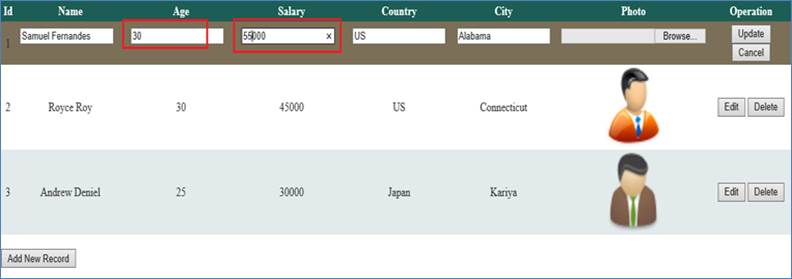
**Step 9**:- For updating records click button “**Edit**” and change TextBox Data and you can select a new photo of the employee. For example in place of age “28”, updated with “30” and in place of salary “50000”, updated with “55000”, then click button “**Update**”. Through the button “**Cancel**” you return previous stage.
**Step 10:-** For record deletion, click on the button “**Delete**”. Before deleting records, a confirmation alert message is a popup.
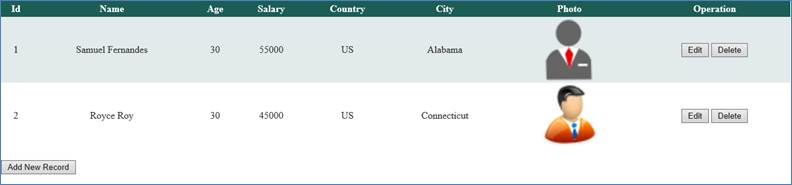
Here I have deleted 3rd record (e.g. Andrew Daniel). After deleting record your GridView looks as following.
\
## CRUD Operation Using Modal Dialog in ASP.NET MVC
URL: https://www.mindstick.com/articles/1117/crud-operation-using-modal-dialog-in-asp-dot-net-mvc
## CRUD Operation Using Modal Dialog in ASP.NET MVC
In this article I am going to explain how to complete add, update, delete and find OR CRUD ([**Create, Retrieve, Update, Delete**](https://www.mindstick.com/articles/1107/insert-delete-update-in-sql-using-web-service-in-asp-dot-net)) Operation using razor view engine in ASP.NET MVC3 or above version.
Here into this example, I will use modal dialog by using JavaScript to add, edit, delete and find operation.
Please follow the steps given below to create an application that allows the user to add, edit, delete and find records of the student.
Open Microsoft Visual Studio 2010 à Select New Project à Select Web from the Installed Templates à Select ASP.NET MVC3 or
[MVC4 Web Application](https://www.mindstick.com/Articles/974/insert-delete-update-in-gridview-in-asp-dot-net-using-c-sharp) à Enter the project name Modal_CRUD_MVC in the Name textbox à Click OK.
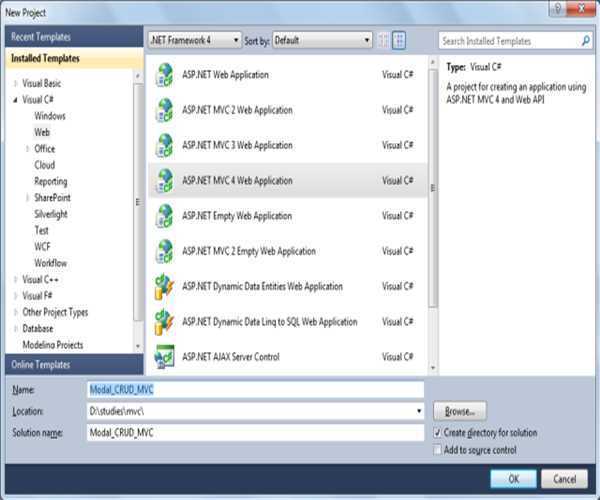
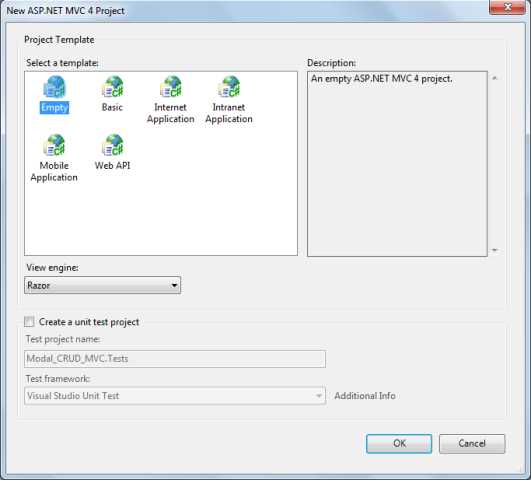
After selecting the project you can see the following dialog box:
Select Empty from the Select a template option à Select Razor view engine à Click OK.
\
Add the following Modal classes (Student and StudentContext) in your Model folder:
Student class represents the table structure in the database and StudentContext Students' property represents the name of the table and data of the students in the database.
```
public class Student
{
public int StudentID { get; set; }
public string Name { get; set; }
public string Age { get; set; }
public string State { get; set; }
public string Country { get; set; }
}
public class StudentContext : DbContext
{
public DbSet Students
{
get;
set;
}
}
```
Also include Entity framework reference in your project because in this application we are going to use entity framework code first model to add, edit, delete and find records from the database.
To include entity framework dll, follow these steps:
Go to Project à Manage NuGet Packages à Enter entity framework in the search textbox and search online.
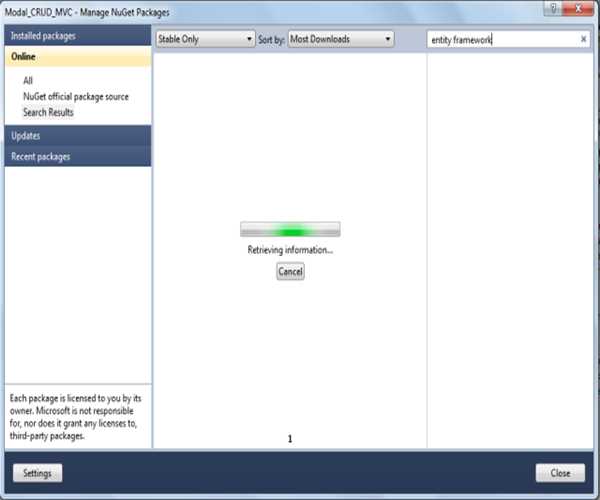\
You will find the latest version of the Entity framework version.
You also have to configure your web.config file for the implementation of this project. Add the connectionStrings element under the configuration tag:
```
```
Add a Controller in your project and edit the controller name as HomeController as shown in the figure below:
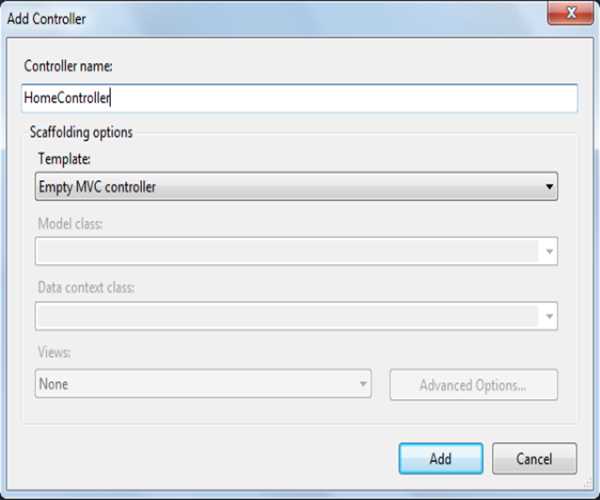\
After adding HomeController, add an Index view into your project:
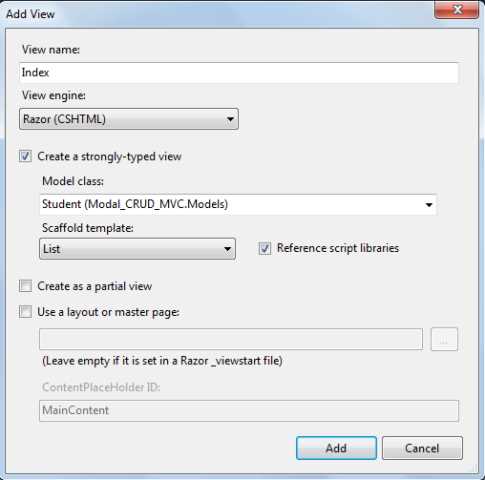\
Edit the Index view and add the following code as given below. Also, include these
files (jquery-ui.min.css, jquery-1.7.1.min.js, jquery-UI-1.8.20.min.js) in your project.
```
@model IEnumerable
@{
Layout = null;
}
Index
@Html.ActionLink("Edit", "AddEditRecord", new { id = item.StudentID }, new { @class = "editDialog" })|
@Html.ActionLink("Details", "Details", new { id = item.StudentID }, new { @class = "viewDialog" }) |
@Html.ActionLink("Delete", "DeleteRecord", new { id = item.StudentID }, new { @class = "confirmDialog" })
}
Are you sure to delete ?
```
I have put all the code necessary to perform add, edit, delete and find records of the students in the Index view.
In this project, we do not have any Layout or Master page.
After including files in the project, your solution explorer might something look like this:
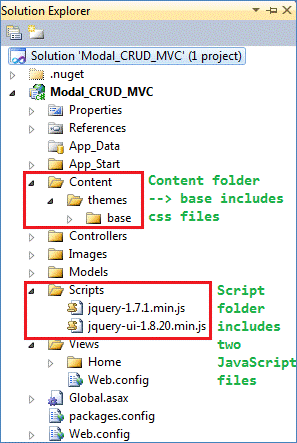\
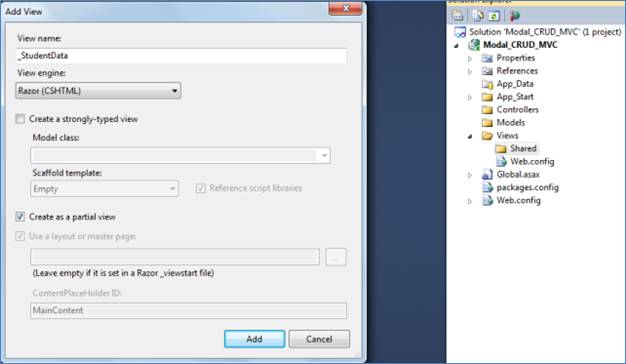
Add a partial view _StudentData in Views à Home folder.
\
Edit the _StudentData partial view as below:
```
@model Modal_CRUD_MVC.Models.Student
@using (Ajax.BeginForm("AddEditRecord", "Home", new AjaxOptions{ HttpMethod = "POST", UpdateTargetId = "studentDialog" }))
{
@Html.ValidationSummary(true)
}
```
Also, add the StudentData view in the same folder Views à Home. This view will response by the controller to the browser if the JavaScript is turned off otherwise the above partial view will display in a modal dialog to the user.
```
@model Modal_CRUD_MVC.Models.Student
@using (Html.BeginForm("AddEditRecord", "Home"))
{
@Html.ValidationSummary(true)
}
```
Add a partial view _StudentDetails in Views à Home folder.
Edit the _StudentDetails partial view as below:
```
@model Modal_CRUD_MVC.Models.Student
```
Add and Edit StudentDetails in Views => Home folder.
The purpose of adding the StudentDetails view is the same as I have explained above for the StudentData view.
```
@model Modal_CRUD_MVC.Models.Student
@{
Layout = null;
}
StudentDetails
@Html.ActionLink("Edit", "Edit", new { id = Model.StudentID }, new { @class = "editDialog" }) |
@Html.ActionLink("Back to List", "Index")
```
I have finished the Model and View portion. Now I am going to explain the HomeController and its Action methods which are necessary in order to run our application.
Index action returns a View along with the list of students:
```
public class HomeController : Controller
{
StudentContext db = new StudentContext();
public ActionResult Index()
{
return View(db.Students.ToList());
}
}
```
Add the AddEditRecord action with the parameter (id) which can be either null or not null. If the id parameter is null it will return empty _StudentData or StudentData, partial view or View respectively otherwise it will find the record of the student on the basis of id and passes the student model to the view in order to update the student details.
Here I am also creating a dynamic property ViewBag. IsUpdate to change the button type in view. If the IsUpdate is true it will set button text as Update and if IsUpdate is false then it will be set as Save.
```
[HttpGet]
public ActionResult AddEditRecord(int? id)
{
if (Request.IsAjaxRequest())
{
if (id != null)
{
ViewBag.IsUpdate = true;
Student student = db.Students.Where(m => m.StudentID == id).FirstOrDefault();
return PartialView("_StudentData", student);
}
ViewBag.IsUpdate = false;
return PartialView("_StudentData");
}
else
{
if (id != null)
{
ViewBag.IsUpdate = true;
Student student = db.Students.Where(m => m.StudentID == id).FirstOrDefault();
return PartialView("StudentData", student);
}
ViewBag.IsUpdate = false;
return View("StudentData");
}
}
```
Add the AddEditRecord action which is of HttpPost type to add or update student records. If the cmd contains Save it will add the record of the student in the database otherwise update the data of students in the database.
```
[HttpPost]
public ActionResult AddEditRecord(Student student, string cmd)
{
if (ModelState.IsValid)
{
if (cmd == "Save")
{
try
{
db.Students.Add(student);
db.SaveChanges();
return RedirectToAction("Index");
}
catch { }
}
else
{
try
{
Student stud = db.Students.Where(m => m.StudentID == student.StudentID).FirstOrDefault();
if (stud != null)
{
stud.Name = student.Name;
stud.Age = student.Age;
stud.State = student.State;
stud.Country = student.Country;
db.SaveChanges();
}
return RedirectToAction("Index");
}
catch { }
}
}
if (Request.IsAjaxRequest())
{
return PartialView("_StudentData", student);
}
else
{
return View("StudentData", student);
}
}
```
To delete the record of students adds the DeleteRecord action in the HomeController. This will delete the record of a student from the database on the basis of id.
```
public ActionResult DeleteRecord(int id)
{
Student student = db.Students.Where(m => m.StudentID == id).FirstOrDefault();
if (student != null)
{
try
{
db.Students.Remove(student);
db.SaveChanges();
}
catch { }
}
return RedirectToAction("Index");
}
```
To view the details of the student, add the Details action in your HomeController. This will display the details of a student on the basis of id.
```
public ActionResult Details(int id)
{
Student student = db.Students.Where(m => m.StudentID == id).FirstOrDefault();
if (student != null)
{
if (Request.IsAjaxRequest())
{
return PartialView("_StudentDetails", student);
}
else
{
return View("StudentDetails", student);
}
}
return View("Index");
}
```
Now both coding and design part is over. To test an application, run or debug your application:
I have added a few records during coding. You can add student records by using Create New option.
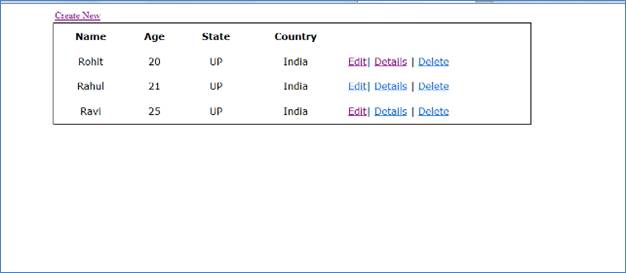\
To edit records, just press the edit link given for each student in a row.
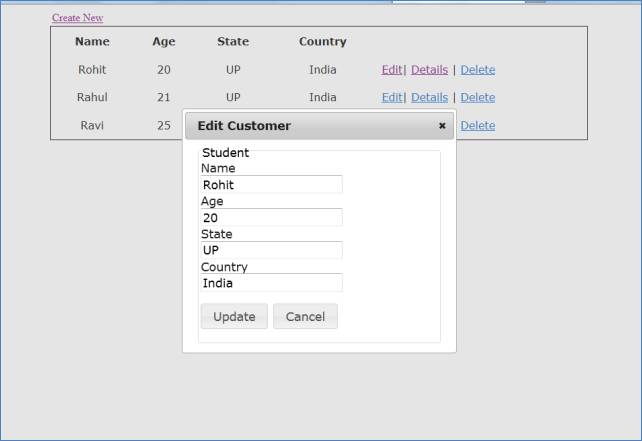\
If the JavaScript is turned off, you cannot use a modal dialog to add and edit the records of students, then, in that case, you can use the StudentData view to add and edit the records.
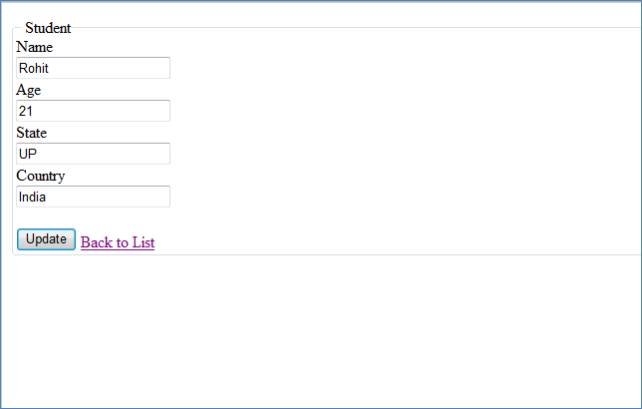\
To delete the record of the student, use the Delete link.
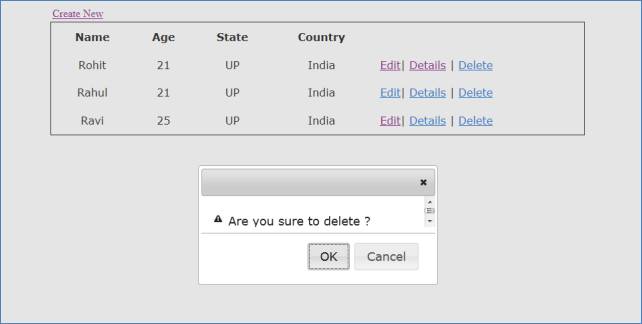\
Thanks for reading this article. You can enter your valuable comments and suggestion to improve this article in the comment box.
## Print and Print Preview separately using HTML, CSS and JavaScript
URL: https://www.mindstick.com/articles/1103/print-and-print-preview-separately-using-html-css-and-javascript
Hi Friends today Into this article, we are trying to make print and print preview separately using HTML, CSS, and JavaScript
If we create an application on HTML with CSS and JavaScript and I need to add print and print preview button separately on this application.
Here I am making a demo project on HTML with CSS and JavaScript.
Now firstly make a HTML file which is print on paper.
##### Code:
```
Student Name
John Sypon
Student Rollnumber
R001
Student Address
132 Kane Street Toledo OH 43612.
```
We can add the css file in our html file:
```
```
Output:
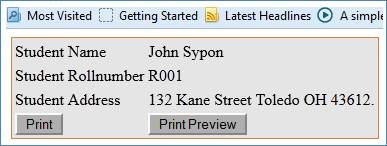
And I am also added two CSS for make fine-looking our application, below is listed both css:
##### 1. Print.css
##### 2. Style.css
##### Print.css: The Print.css file is making a fine-looking our application when we give the print or print preview command. Below is Print.css file code.
```
@media print /*--This is for Print--*/
{
.btn
{
display: none;
}
.tble
{
background-color: #CD853F;
border:1px solid green;
-webkit-print-color-adjust: exact
/*above line of codes will set the table background-color and change the border color when we give the print and preview (print preview only when we see on print preview via browser) command*/
}
}
@media screen /*--This is for Print Preview Screen--*/
{
.btn
{
display: none;
}
.tble
{
background-color: #CD853F;
border:1px solid green;
}
}
```
Above @media screen use for change the style when we show on print preview, this print preview is made by itself in our application, I am creating this print preview using javascript in a window format and we also known as every html application is need the style for stunning our application, and @media screen provides the style when we open that application in new window as print preview.
##### Style.css
```
@media screen /*--This is for Screen--*/
{
.btn
{
background-color: #AFAFAF;
display: block;
}
.tble
{
background-color: #E5E5E5;
border: 1px solid #CD853F;
}
}
```
Above Stylesheet code will provide the style of our application on-screen (means on browser).
##### JavaScript:
Here I am using the javascript which is made a window where we give the print command.
```
```
Above I created two javascript functions (method) PrintDoc () and PrintPreview ()
##### PrintDoc ():
Now I am explaining PrintDoc():-
1. I am creating a variable toPrint named and initialize with document.getElementById('printarea') printareais the id of table which is we want to print.
2. Now here I am also is create a variable with popupWin named and it is initialize with window.open('', '_blank', 'width=350,height=150,location=no, left=200px') This line will make a window.
3. popupWin.document.open() this code will open the window with 350px width and 150px height.
4. popupWin.document.write('::Preview::') this line will generate a print dialog box, and add the css file for this window.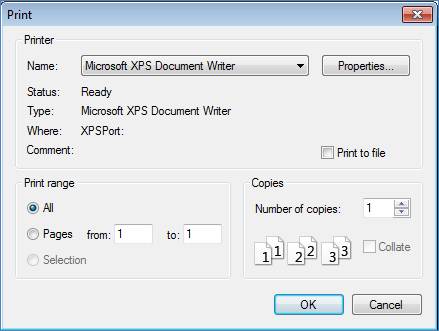
- PopupWin.document.write(toPrint.innerHTML) this line add the data which want to print in the Print window.
- PopupWin.document.close() this line will close the document. PrintPreview ().
This method will work same as PrintDoc() method but the difference is that in this method is making for print preview your document.
Below are images for print and print preview
1. Below the first time load in browser.\ 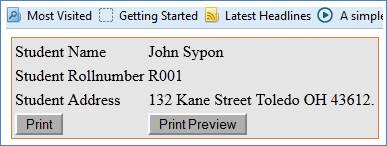
2. When we click on the Print Preview button the background-color and border-color will change on this window and print and print preview button will also hide in this window.\ 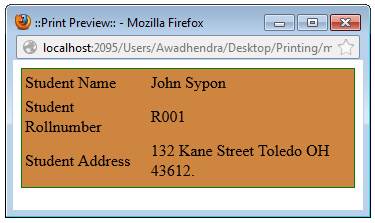
3. When we click on print button. This is print on paper.\ 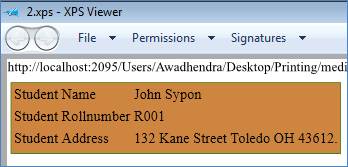
##### Note:
When we give the print preview command the background color will not load this problem resolve for Mozilla you can go on Page Setup and check the Print Background.
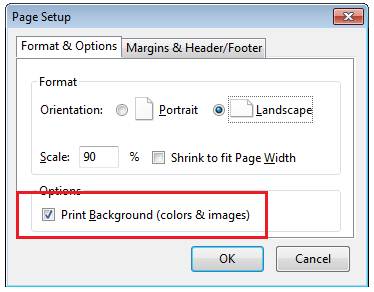
And for webkit we add the -WebKit-print-color-adjust: exact add in CSS file.
\
Please Read also this Article :- **[CRUD Operation in Node.js with MongoDB](https://www.mindstick.com/Articles/1469/crud-operation-in-node-js-with-mongodb)**
## Editable Grid View System using BootStrap in ASP.Net
URL: https://www.mindstick.com/articles/1385/editable-grid-view-system-using-bootstrap-in-asp-dot-net
## Editable Grid View System using BootStrap in ASP.Net
In this blog, I’m explaining how to make a gridview editable using bootstrap in asp.net.
##### Step 1:
First, create an asp.net empty [**web application**](https://www.mindstick.com/articles/1117/crud-operation-using-modal-dialog-in-asp-dot-net-mvc) and add a web form to the solution.
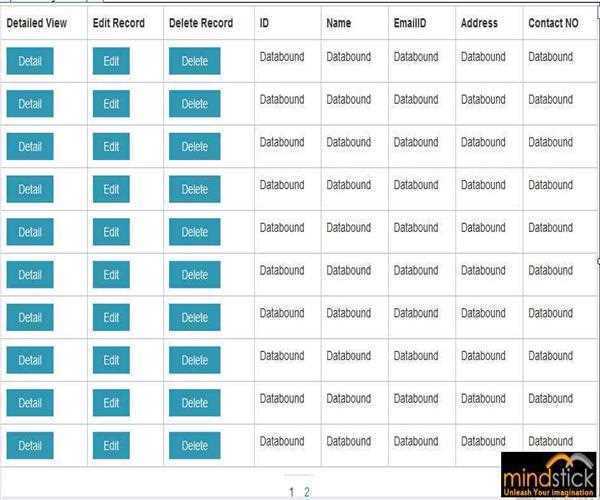\
##### Step 2:
Now add a gridview by drag and drop from the toolbox and give these properties and event:
| ``` OnRowCommand="GridView1_RowCommand"AutoGenerateColumns=”false”AllowPaging=” true”DataKeysName=” ID” ``` |
| --- |
As you make true to these properties, your gridview will look like this:
##### Step 3:
Now add the below code in the .aspx.cs file:
```
protectedvoid Page_Load(object sender, EventArgs e){
DataLoad();
}
publicvoid DataLoad(){
string message = string.Empty; try {
SqlConnection connection = GlobalClass.OpenConnection(out message); if (connection != null && string.IsNullOrEmpty(message)) { string cmd = "select * from GridView"; SqlDataAdapter dAdapter = newSqlDataAdapter(cmd, connection); DataSet ds = newDataSet(); dAdapter.Fill(ds); dt = ds.Tables[0]; //Bind the fetched data to gridview grdvCrudOperation.DataSource = dt; grdvCrudOperation.DataBind(); grdvCrudOperation.Columns[3].Visible = false;
} }
catch (Exception ex) {
message = ex.Message;
}
finally {
GlobalClass.CloseConnection(out message);
}
}
```
When you run the above code, this will display all values from the Employee table.
##### Step 4:
To make the gridview editable, create three-button field inside gridview
1.
```
```
2.
```
```
3.
```
```
##### Step 5:
Now add the code to the events:
##### Details
```
protectedvoid GridView1_RowCommand(object sender, GridViewCommandEventArgs e){ int index = Convert.ToInt32(e.CommandArgument); if (e.CommandName.Equals("detail")) {
int ID = Convert.ToInt32(grdvCrudOperation.DataKeys[index].Value.ToString()); IEnumerable query = from i in dt.AsEnumerable()
where i.Field("ID").Equals(ID) select i; DataTable detailTable = query.CopyToDataTable(); DetailsView1.DataSource = detailTable; DetailsView1.DataBind(); System.Text.StringBuilder sb = new System.Text.StringBuilder(); sb.Append(@""); ScriptManager.RegisterClientScriptBlock(this, this.GetType(), "DetailModalScript", sb.ToString(), false);
}
}
```
RowEditing
```
protectedvoid GridView1_RowCommand(object sender, GridViewCommandEventArgs e){ int index = Convert.ToInt32(e.CommandArgument); if (e.CommandName.Equals("editRecord")) {
GridViewRow gvrow = grdvCrudOperation.Rows[index]; HfUpdateID.Value = HttpUtility.HtmlDecode(gvrow.Cells[3].Text).ToString();
txtNameUpdate.Text = HttpUtility.HtmlDecode(gvrow.Cells[4].Text);
txtEmailIDUpdate.Text = HttpUtility.HtmlDecode(gvrow.Cells[5].Text); txtAddressUpdate.Text = HttpUtility.HtmlDecode(gvrow.Cells[6].Text); txtContactUpdate.Text = HttpUtility.HtmlDecode(gvrow.Cells[7].Text); lblResult.Visible = false; System.Text.StringBuilder sb = new System.Text.StringBuilder(); sb.Append(@"");
ScriptManager.RegisterClientScriptBlock(this, this.GetType(), "EditModalScript", sb.ToString(), false);
}
}
protectedvoid btnSave_Click(object sender, EventArgs e){ string message = string.Empty; try
{
SqlConnection connection = GlobalClass.OpenConnection(out message); if (connection != null && string.IsNullOrEmpty(message)) { SqlCommand cmd = newSqlCommand("Proc_UpdateGridView", connection); cmd.CommandType = CommandType.StoredProcedure; cmd.Parameters.AddWithValue("@ID",HfUpdateID.Value); cmd.Parameters.AddWithValue("@Name", txtNameAdd.Text.Trim()); cmd.Parameters.AddWithValue("@EmailID", txtEmailIDAdd.Text.Trim()); cmd.Parameters.AddWithValue("@Address", txtAddressAdd.Text.Trim()); cmd.Parameters.AddWithValue("@Contact", txtContactAdd.Text.Trim()); int row = cmd.ExecuteNonQuery(); }
}
catch (Exception ex) { message = ex.Message;
}
finally {
GlobalClass.CloseConnection(out message); }
DataLoad(); System.Text.StringBuilder sb = new System.Text.StringBuilder(); sb.Append(@"");
ScriptManager.RegisterClientScriptBlock(this, this.GetType(), "EditHideModalScript", sb.ToString(), false);
}
```
RowDeleting
```
protectedvoid GridView1_RowCommand(object sender, GridViewCommandEventArgs e)
{
int index = Convert.ToInt32(e.CommandArgument); if (e.CommandName.Equals("deleteRecord")) {
string code = grdvCrudOperation.DataKeys[index].Value.ToString(); HfDeleteID.Value = code; System.Text.StringBuilder sb = new System.Text.StringBuilder(); sb.Append(@""); ScriptManager.RegisterClientScriptBlock(this, this.GetType(), "DeleteModalScript", sb.ToString(), false);
}
}
protectedvoid btnDelete_Click(object sender, EventArgs e){
string message = string.Empty; try {
SqlConnection connection = GlobalClass.OpenConnection(out message); if (connection != null && string.IsNullOrEmpty(message)) {
SqlCommand cmd = newSqlCommand("Proc_DeleteGridView", connection); cmd.CommandType = CommandType.StoredProcedure; cmd.Parameters.AddWithValue("@ID", HfDeleteID.Value); int row = cmd.ExecuteNonQuery();
}
}
catch (Exception ex) {
message = ex.Message; }
finally {
GlobalClass.CloseConnection(out message); }
DataLoad(); System.Text.StringBuilder sb = new System.Text.StringBuilder(); sb.Append(@"");
ScriptManager.RegisterClientScriptBlock(this, this.GetType(), "delHideModalScript", sb.ToString(), false);
}
```
RecordInserted
```
protectedvoid btnAdd_Click(object sender, EventArgs e) //Open Model popup{
System.Text.StringBuilder sb = new System.Text.StringBuilder(); sb.Append(@""); ScriptManager.RegisterClientScriptBlock(this, this.GetType(), "AddShowModalScript", sb.ToString(), false);
}protectedvoid btnAddRecord_Click(object sender, EventArgs e){
string message = string.Empty; try {
SqlConnection connection = GlobalClass.OpenConnection(out message); if (connection != null && string.IsNullOrEmpty(message)) {
SqlCommand cmd = newSqlCommand("Proc_SaveGridView", connection); cmd.CommandType = CommandType.StoredProcedure; cmd.Parameters.AddWithValue("@Name", txtNameAdd.Text.Trim()); cmd.Parameters.AddWithValue("@EmailID", txtEmailIDAdd.Text.Trim()); cmd.Parameters.AddWithValue("@Address", txtAddressAdd.Text.Trim()); cmd.Parameters.AddWithValue("@Contact", txtContactAdd.Text.Trim());
int row = cmd.ExecuteNonQuery(); }
}
catch (Exception ex) { message = ex.Message;
} finally {
GlobalClass.CloseConnection(out message);
}
DataLoad(); System.Text.StringBuilder sb = new System.Text.StringBuilder(); sb.Append(@""); ScriptManager.RegisterClientScriptBlock(this, this.GetType(), "AddHideModalScript", sb.ToString(), false);
}
```
##### GridView.aspx
#####
```
<%@PageLanguage="C#" AutoEventWireup="true"CodeBehind="GridView.aspx.cs"Inherits="GridViewCRUDBootstrapExample.Default"%>
Grid View System
× Details Close
× Edit Record
Name :
EmailID
Address
Contact No
Close
× Add New Record
Name :
EmailID :
Address:
Contact No:
Close
× Delete Record
Are you sure you want to delete the record? Cancel