---
title: "Custom Authentication in Node.js"
description: "In this article, I’ explaining the concept of authentication in node.js. Authentication is a technique to protect the system"
author: "Anchal Kesharwani"
published: 2014-08-23
updated: 2019-09-07
canonical: https://www.mindstick.com/articles/1481/custom-authentication-in-node-js
category: "node.js"
tags: ["node js"]
reading_time: 7 minutes
---
# Custom Authentication in Node.js
In this article, I’ explaining the concept of authentication in node.js. Authentication is a technique to protect the system.
Here, I’m creating a simple authentication in this article. There is a lots of authentication modules in the node.js as like PassportJS and Everyauth and they are also very useful for integration your web site with social networks like Facebook and Twitter. Here I’ creating our authentication for an application.
Before start I should mention that the MongoDB as a database saving and loading the users. And I integrate it with our app using Mongoose module. So make sure you have them installed or if you using my source files first run npm install. Also make sure you are running mongo server by running mongod in new shell.
Note: In this article I did not give the functionality of remember me option this option give in the next article.
It is the simple authentication that give the way to secure your application. There are following steps follow to authentication:
##### Step 1 Create an express project
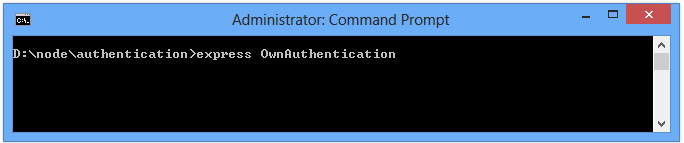
Hit enter and create the express project. Here, I only give normal authentication for
user.
##### Step 2 Install Dependency
This step install the dependency by the package.json. First open up the
package.json from the project and replace this code:
```
{ "name": "OwnAuthentication", "version": "0.0.1", "private": true, "scripts": { "start": "node ./bin/www" }, "dependencies": { "express": "~4.2.0", "static-favicon": "~1.0.0", "morgan": "~1.0.0", "cookie-parser": "~1.0.1", "body-parser": "~1.0.0", "debug": "~0.7.4", "jade": "~1.3.0", "mongodb":"*", "monk":"*", "express-session":"*" }}
```
Install the dependency the npm install command.
##### Step 3 Create the Login & Sign Up form
Create the login.jade in the /views folder and add the following code:
##### extends layout
```
block content h1 Login p You are ready to Login! div#login form(id="login", method="POST", action="/login") table tbody tr td lable(for='username') Username: td input#username(type='text', name='username', placeholder="username") tr td lable(for='password') Password: td input#password(type='password', name='password', placeholder="password") tr td(colspan="2",style="text-align:center") input(type="submit", value="Log In" style="width:100%;height:30px;background-color:rgb(102, 102, 245);color:white;font-weight:bold;") tr td(colspan="2",style="text-align:left") input(type="checkbox", name="remember") span(style="") Stay signed in! tr td(colspan="2",style="text-align:center") a(href="/signup") span Create an account
```
And then after create the signup.jade file in the /views folder and add this code:
## extends layout
```
block content h1 Sign Up! p You are ready to sign up! div#signup form(id="signup", method="POST", action="/signup") table tbody tr td lable(for='username') User Name td input#username(type='text', name='username') tr td lable(for='firstname') First Name td input#firstname(type='text', name='firstname') tr td lable(for='lastname') Last Name td input#lastname(type='text', name='lastname') tr td lable(for='email') E-mail td input#email(type='text', name='email') tr td lable(for='password') Password td input#password(type='password', name='password') tr td lable(for='age') Age td input#age(type='text', name='age') tr td lable(for='gender') Gender td input#gender(type='text', name='gender') tr td(colspan="2",style="text-align:center") input(type="submit", value="Sign UP" style="width:100%;height:30px;background-color:rgb(102, 102, 245);color:white;font-weight:bold;")
```
Step 4 Add Some Code in app.js
There are following code in the app.js that included some necessary modules:
First open up app.js file in your application folder and write the necessary modules:
```
var express = require('express');var http = require('http');var path = require('path');var favicon = require('static-favicon');var logger = require('morgan');var cookieParser = require('cookie-parser');var bodyParser = require('body-parser');
```
Add these modules after above lines to accessible database and session:
```
//New code for sessionvar session = require('express-session')// Databasevar mongo = require('mongodb');var monk = require('monk');var db = monk('localhost:27017/UserAuthenticationDB');
```
Add new line to use the session in the application
```
app.use(favicon());app.use(logger('dev'));app.use(bodyParser.json());app.use(bodyParser.urlencoded());app.use(cookieParser('my secret here')); this make accessible to cookieapp.use(session({secret: 'my session here'})); // add for sessionapp.use(express.static(path.join(__dirname, 'public')));
```
This code database make accessible to our router
```
// Make our db accessible to our routerapp.use(function(req,res,next){ req.db = db; next();});
```
This code add above of the two lines otherwise it’s not working:
```
app.use('/', routes);app.use('/users', users);
```
Step 5 Connect to the Database
This step help to how to establish the connection. First create a directory in your application ‘data’ name. And after that open a new command prompt with administrator and select mongo location run the mongod command to connect:

And then open a new command prompt to create database and table after that create database as UserAuthenticationDB and create the collection or table with some fields by as like username, firstname, lastname, email, password, age and gender.
Let’s move the next step.
##### Step 5 To Authenticate simple code to the /views/index.js
In this example authentication is managed by the session and mongodb database
system.
First open this file and simply replace all code by this:
```
var express = require('express');var router = express.Router(); /* GET home page. */router.get('/', function(req, res) { if(req.session.username) { // if session exist for user res.send("Welcome " + req.session.username + "
" + "logout"); } else { // else render login for login res.render('login', { title: 'Login' }); } }); module.exports = router;
```
This code check if the user exist the give the Welcome message either open the
login page. After that you need to add router for the signup:
```
router.get('/signup', function(req, res) { if(req.seesion.username) { // if seesion exist res.redirect("/"); } else { res.render('signup', { title: 'signup' }); }});
```
If user login then go to home otherwise signup. Now need to add router for logout:
```
router.get('/logout', function (req, res) { req.session.destroy(function () { res.redirect('/'); // redirect at the home }); });
```
In this block destroy session when logout the user. And now add post action for the
/signup router:
```
router.post('/signup', function(req, res) { // Set our internal DB variable var db = req.db; // Get our form values. These rely on the "name" attributes of form var username = req.body.username; var firsname = req.body.firsname; var lastname=req.body.lastname; var email=req.body.email; var password=req.body.password; var age=req.body.age; var gender=req.body.gender; var collection = db.get('Users'); // insert new user if not exist else get the error collection.findOne({username: username}, function(err, document) { if(document==null) { collection.insert({ "username" : username, "firsname" : firsname, "lastname":lastname, "email":email, "password":password, "age":age, "gender":gender, }, function (err, doc) { if (err) { // If it failed, return error res.send("There was a problem adding the information to the database."); } else { req.session.regenerate(function(){ req.session.username = req.body.username; res.send("Welcome " + req.body.username + "
" + "logout"); }); } }); } else { res.send("User already exist!"); } });});
```
In this block save the new user. If the user already exist give the error otherwise it
add new user and give the welcome message. It also maintain on successfully sign
up. Here regenerate the session that means old session destroy.
And now add post action for the /login router:
```
router.post('/login',function(req,res){ // Set our internal DB variable var db = req.db; var collection = db.get('Users'); // if username and password exist then login successfully collection.findOne({$and: [{username: req.body.username},{password:req.body.password}]}, function(err, document) { if(document==null) { res.location("/"); // And forward to success page res.redirect("/"); } else { req.session.regenerate(function(){ req.session.username = req.body.username; res.send("Welcome " + req.body.username + "
" + "logout"); }); } }); });
```
In this block when user exist login successfully it check from the database if exist
then login and give the welcome message otherwise it redirect to the login. It also
maintain on successfully login. Here regenerate the session that means old session
destroy.
Let’s ready for check our authentication to see that and check it at the
http://localhost:3000/. Before go to the browser run mongodb server and then run
application with ‘npm start’ command.

Let’s show on the browser:

This is the home here in this time there are no user. Let’s create an account:

Register the new user and click on the sign up yes your will created and check to
login:

You can check logout then login with user sumit:

If you didn’t give the correct username or password you didn’t to able successfully
authenticate otherwise if successfully login give the welcome message:

I hope that this article is helpful for you. Thanks!
---
Original Source: https://www.mindstick.com/articles/1481/custom-authentication-in-node-js
Copyright © MindStick Software Pvt. Ltd. This Markdown version is provided for developers, AI systems, and offline reading.